
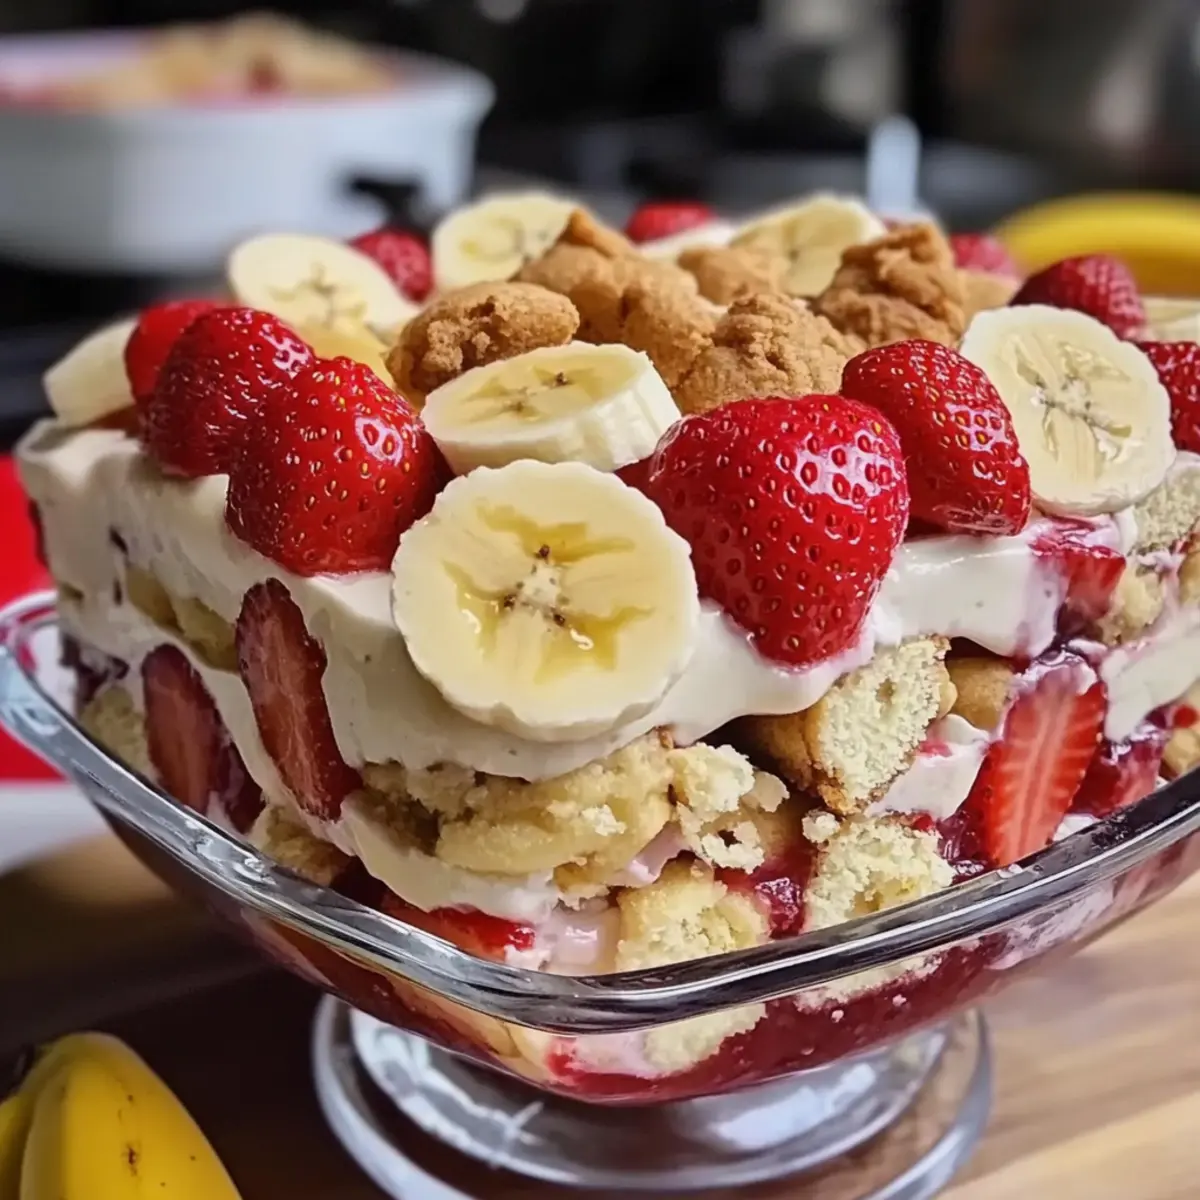
With a tangy-sweet aroma wafting through the kitchen, I found myself swept away to sun-drenched picnics and carefree summer days. If you’re craving a delightful no-bake dessert that’s as easy as it is delicious, let me introduce you to my Strawberry Banana Pudding Dream. This creamy concoction beautifully pairs fresh strawberries and ripe bananas, creating layers of indulgence that will leave everyone wanting seconds. In just 20 minutes of prep time, you can whip up this crowd-pleaser, making it perfect for family gatherings or casual get-togethers. Plus, it’s a vegetarian-friendly treat that can even cater to gluten-free options. Ready to dive into fruity bliss? Let’s create some sweet memories together!
Why is this dessert a must-try?
Irresistible Flavors: Bursting with fresh strawberries and bananas, this dessert is a fruity delight that will tickle your taste buds.
No-Bake Simplicity: Enjoy the ease of this no-bake recipe, which means you won’t spend hours in the kitchen—just quick prep and time to chill!
Perfect for Any Occasion: Versatile enough for picnics or dinner parties, this Strawberry Banana Pudding Dream will dazzle your guests every time.
Quick and Tasty: Ready in just 20 minutes, it’s an ideal solution for last-minute dessert cravings.
Option for Everyone: Catering to dietary preferences? No problem! This recipe offers gluten-free options without sacrificing taste.
Pair it with some homemade Protein Pudding Indulge or serve it alongside a slice of Banana Walnut Cream for an even more delightful dessert spread.
Strawberry Banana Pudding Dream Ingredients
For the Creamy Base
- Cream Cheese – Provides a rich and creamy base; substitute with Greek yogurt or dairy-free cream cheese for a lighter option.
- Sweetened Condensed Milk – Adds sweetness and creaminess; essential for texture in the Strawberry Banana Pudding Dream.
- French Vanilla Pudding Mix – Thickens the pudding mixture and adds flavor; no direct substitution recommended.
- Milk – Hydrates and binds the pudding mixture; use whole or low-fat milk based on preference.
For the Layers
- Vanilla Wafers – Serve as the dessert’s base layers, providing structure; opt for gluten-free wafers for a gluten-free version.
- Bananas (6 to 8, sliced) – Adds natural sweetness and texture; use ripe bananas for the best flavor.
- Strawberries (1 container) – Introduces fresh fruit flavor and color; can substitute with thawed and drained frozen strawberries.
For the Topping
- Whipped Topping (1 container) – Adds a light and fluffy finish; you can use homemade whipped cream or a non-dairy topping as alternatives.
Step‑by‑Step Instructions for Strawberry Banana Pudding Dream
Step 1: Prepare the Creamy Base
In a large mixing bowl, use an electric mixer to combine 8 ounces of softened cream cheese and 1 cup of sweetened condensed milk until the mixture is creamy and smooth—about 2 minutes. Make sure there are no lumps. This rich and creamy base is the heart of your Strawberry Banana Pudding Dream, so ensure it’s well-incorporated.
Step 2: Mix in the Pudding
Next, add 1 package of French vanilla pudding mix and 1 cup of milk to the mixture. Continue mixing for an additional 2-3 minutes until everything is fully combined and the pudding thickens up slightly. This luscious filling will create a velvety texture that works beautifully with the fresh fruit layers you will add soon.
Step 3: Layer the Vanilla Wafers
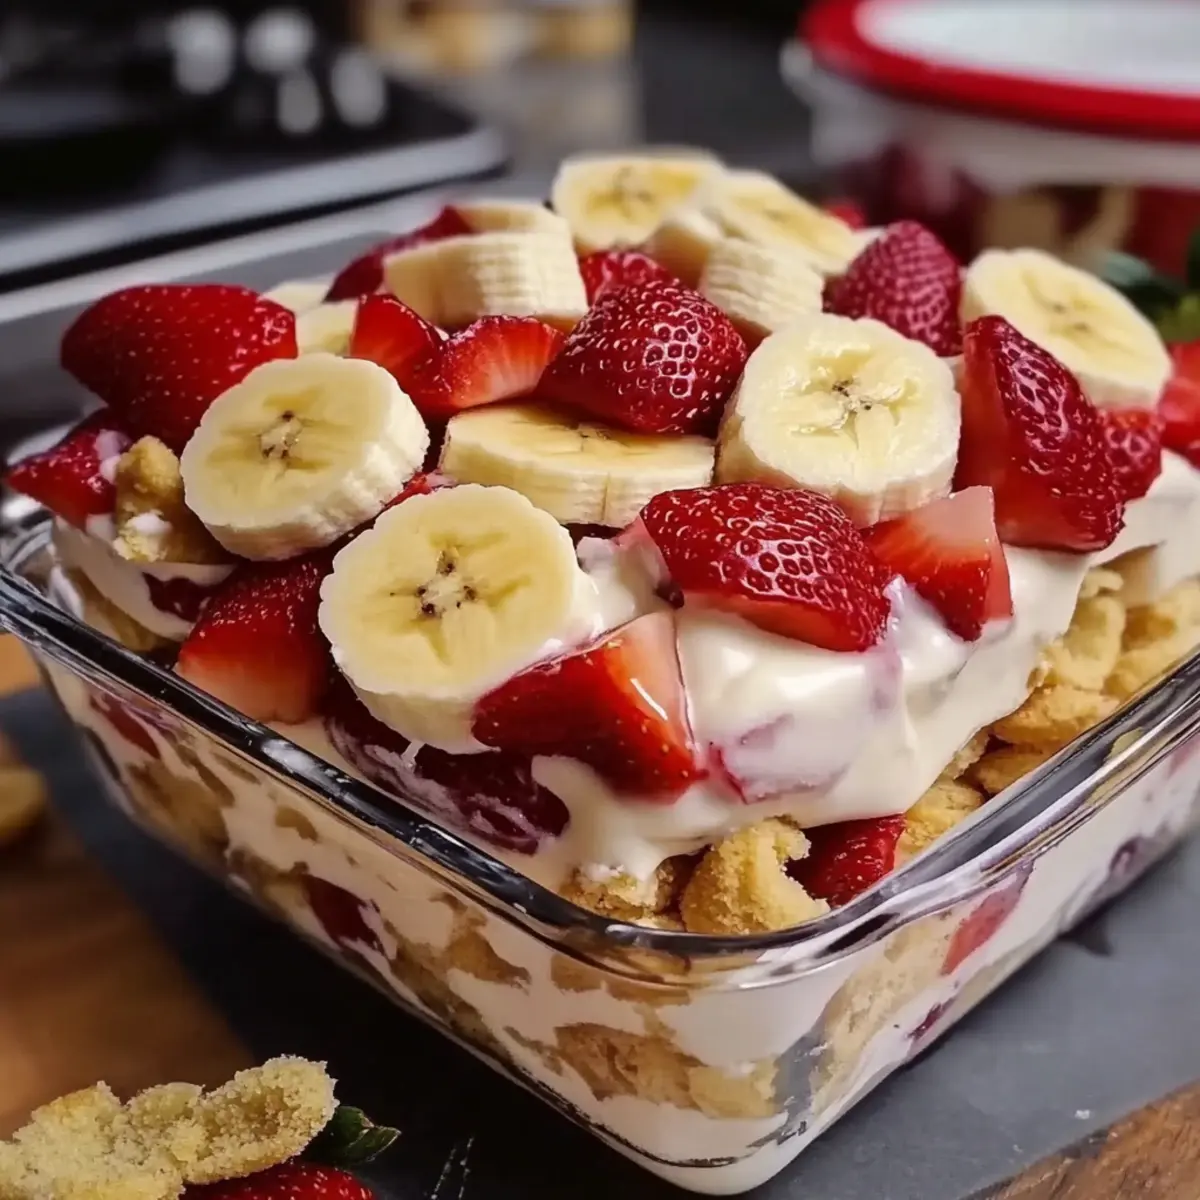
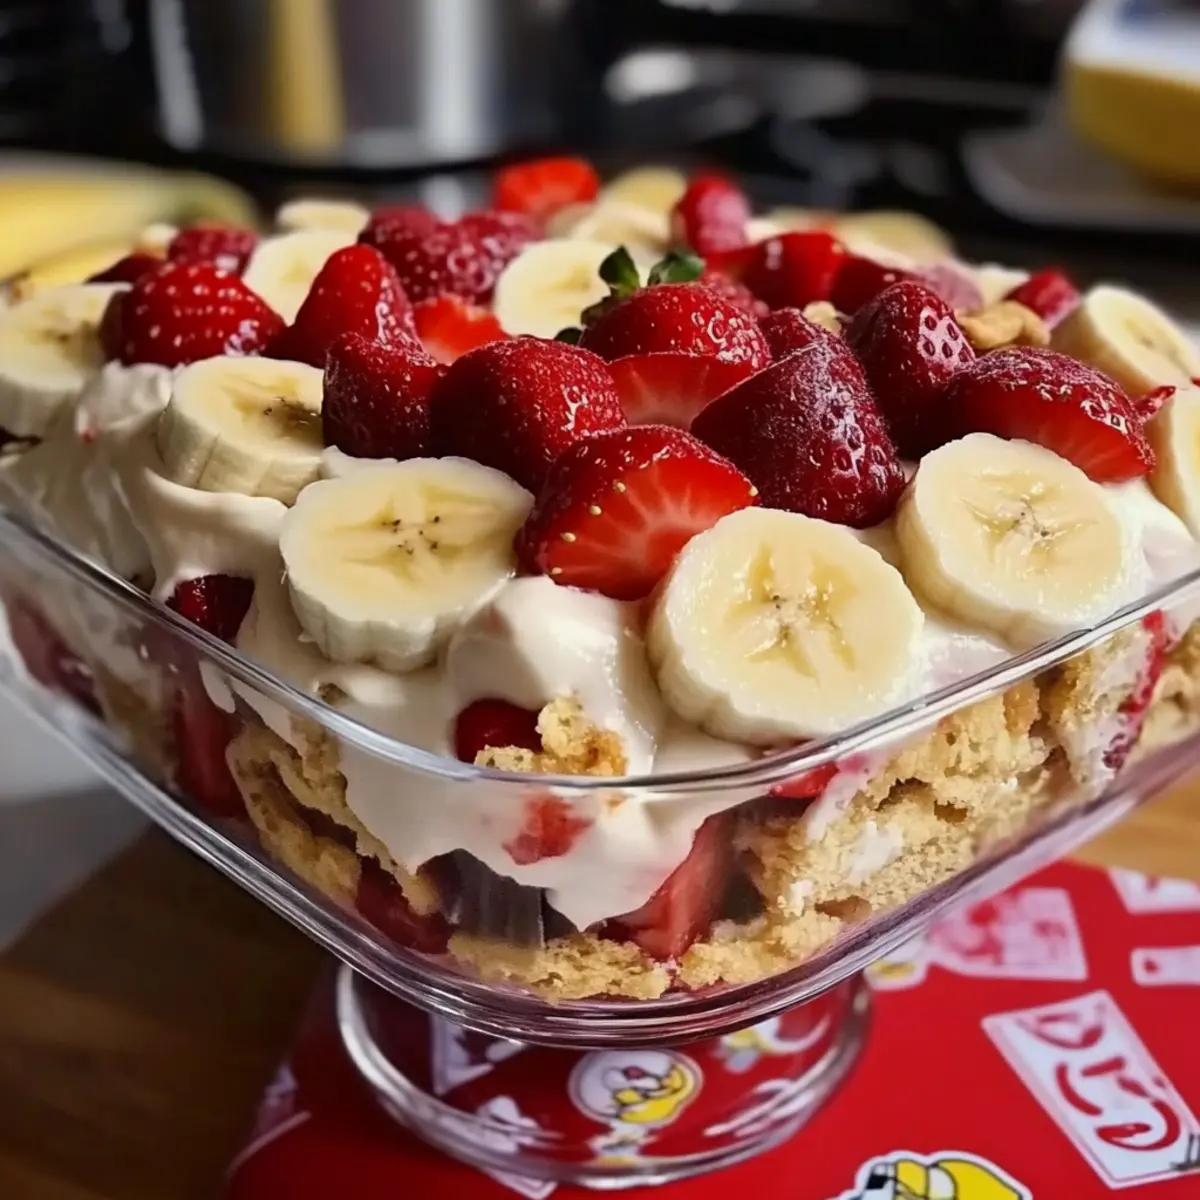
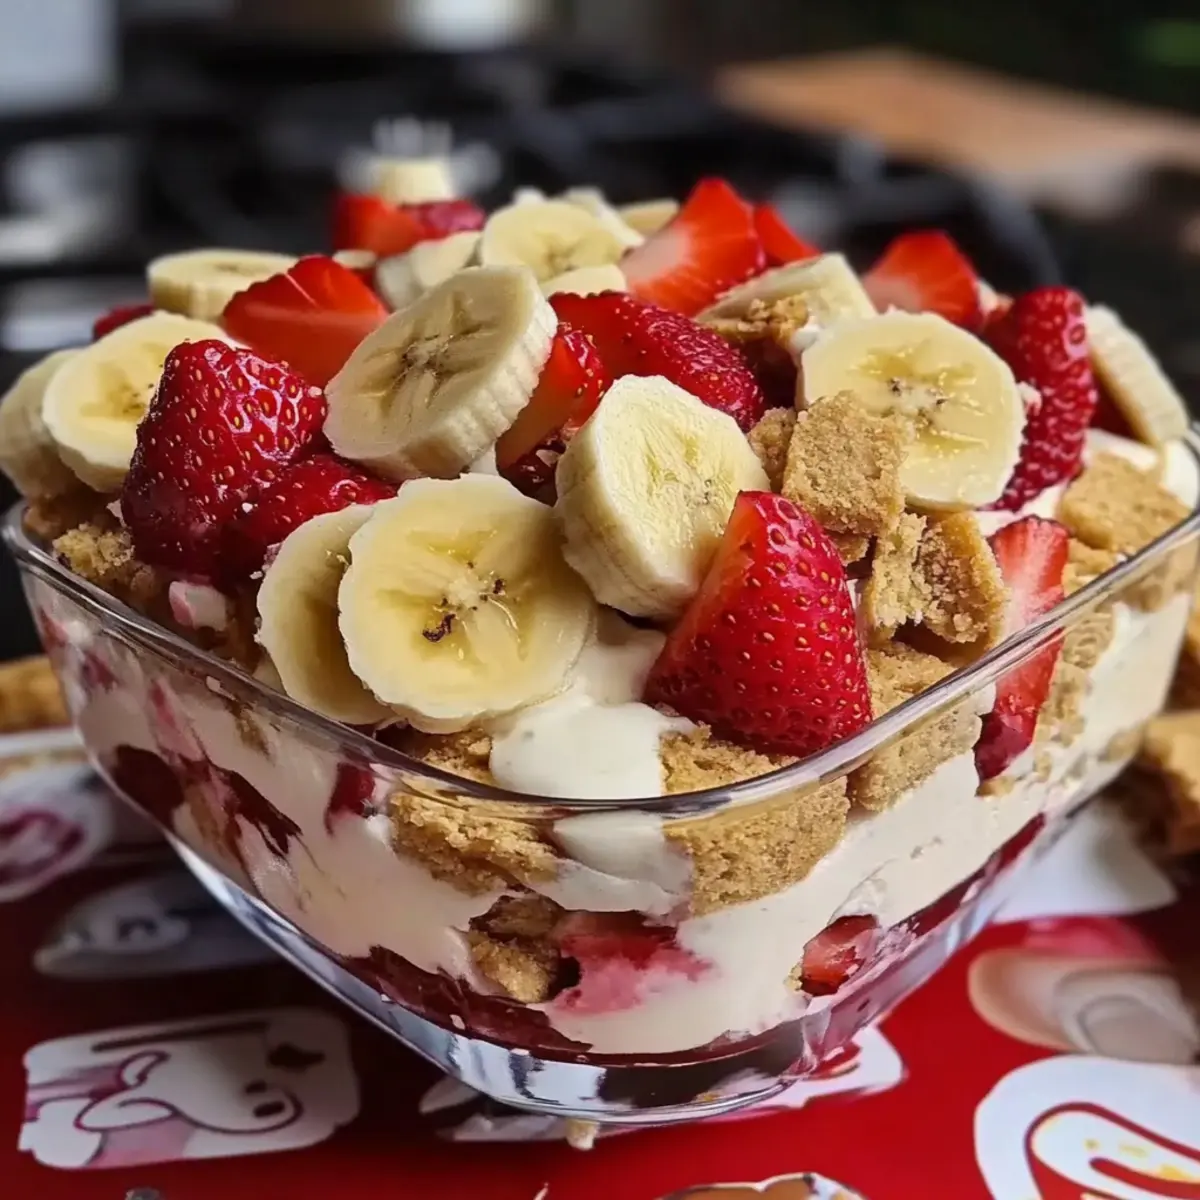
Grab a large serving dish or a trifle bowl—something clear so the beautiful layers show off. Begin by placing an even layer of vanilla wafers at the bottom, covering the base thoroughly. This will serve as the foundation for your Strawberry Banana Pudding Dream, bringing a satisfying crunch to complement the creamy layers.
Step 4: Add the Fruit
Layer 6 to 8 sliced bananas over the vanilla wafers, followed by a layer of fresh strawberries. Arrange the fruit evenly to ensure every bite has the perfect fruity flavor. The freshness of the bananas and strawberries will not only add sweetness but also vibrant colors to your delightful dessert.
Step 5: Pour the Pudding Mixture
Carefully pour half of the prepared pudding mixture over the layered fruit, smoothing it out with a spatula to cover everything evenly. This creamy layer will bind the flavors together, creating an irresistible Strawberry Banana Pudding Dream that everyone’s sure to love.
Step 6: Repeat the Layers
Repeat the layering process by adding another layer of vanilla wafers, followed by the remaining sliced bananas and strawberries. Then, pour the remaining pudding mixture on top, ensuring that the layers are beautifully structured. This repetition enhances both the texture and flavor as it all melds together.
Step 7: Finish with Whipped Topping
Spread 1 container of whipped topping evenly over the top layer of pudding. Use a spatula to make it smooth and appealing. This fluffy finish adds a lightness to your Strawberry Banana Pudding Dream, making it visually striking and deliciously delightful.
Step 8: Chill Before Serving
Cover the dish with plastic wrap and refrigerate for at least 4 hours, or better yet, overnight. This chilling time allows the layers to meld beautifully, creating a wonderfully refreshing dessert. The anticipation will only make your Strawberry Banana Pudding Dream taste even sweeter when served.
How to Store and Freeze Strawberry Banana Pudding Dream
Fridge: Keep your Strawberry Banana Pudding Dream covered in the refrigerator for up to 3 days. This will help maintain its freshness and texture.
Freezer: For longer storage, you can freeze the pudding for up to 1 month. To prevent freezer burn, wrap tightly in plastic wrap and then in foil.
Thawing: When ready to enjoy, thaw in the fridge overnight. Avoid refreezing after thawing to maintain quality.
Reheating: There’s no need to reheat this dessert, as it’s best enjoyed chilled straight from the refrigerator!
Strawberry Banana Pudding Dream Variations
Don’t hesitate to make this recipe your own—there’s no limit to the delicious adjustments you can create!
- Dairy-Free: Swap cream cheese for dairy-free cream cheese and use coconut milk for a vegan twist that’s just as creamy.
- Gluten-Free: Replace vanilla wafers with gluten-free wafers to ensure everyone can enjoy this dessert without a second thought.
- Berry Medley: Add a mix of berries such as blueberries or raspberries for a colorful twist that amps up the flavor and nutrition.
- Nutty Crunch: Sprinkle chopped nuts like almonds or pecans between layers for a delightful crunch that adds texture and enhances flavor.
- Chocolate Delight: Mix in chocolate pudding instead of vanilla for a richer, chocolatey experience that still pairs beautifully with the strawberries and bananas.
- Bite-Sized Treats: Transform this pudding into individual parfaits by layering them in small cups; perfect for parties or picnics!
- Sweetener Adjustments: Use less sweetened condensed milk for a less sweet version, letting the natural fruit flavors shine through.
- Frozen Fun: Freeze the layers for a refreshing frozen treat—just let it sit at room temperature for a few minutes before serving to soften.
Want to explore more delightful ideas? You might enjoy serving this alongside a slice of Strawberry Cheesecake Protein for a fulfilling dessert table! Or why not whip up a batch of Frozen Banana Snacks to pair alongside for a fruity extravaganza?
What to Serve with Strawberry Banana Pudding Dream
Indulging in a Strawberry Banana Pudding Dream creates a cheerful atmosphere, perfectly complemented by delightful side dishes that elevate your gathering.
- Fresh Fruit Salad: A refreshing mix of berries and melons will enhance the fruity flavors of your pudding dream. It’s a vibrant and healthy addition to your dessert table.
- Crunchy Cinnamon Sugar Palmiers: These flaky pastries provide a satisfying crunch, balancing the smoothness of the pudding while adding a hint of cinnamon warmth.
- Light Lemonade or Iced Tea: A zesty lemonade or sweetened iced tea makes for a perfect refreshing drink pairing. The bright acidity cuts through the creaminess, leaving guests feeling refreshed.
- Chocolate-Dipped Strawberries: Indulge in a whimsical touch with these sweet bites! They offer a contrasting texture that complements the creamy pudding while enhancing the strawberry flavor.
- Miniature Cheesecakes: Smooth, creamy cheesecakes create a delightful contrast beside your pudding. Opt for fruit toppings to maintain the berry flavor theme!
- Almond Biscotti: Crunchy, nutty biscotti pairs beautifully with dessert, allowing for a lovely textured experience against the pudding’s fluffiness. Perfect for those who enjoy a little bite!
- Vanilla Ice Cream: A scoop of vanilla ice cream is a timeless classic that creates a luscious experience alongside your no-bake dessert, adding extra creaminess and temperature contrast.
With these delightful pairings, your meal will be complete, ensuring that everyone leaves with satisfied smiles!
Make Ahead Options
These Strawberry Banana Pudding Dreams are perfect for busy home cooks looking to simplify meal prep! You can assemble the dessert up to 24 hours in advance, allowing it to chill and meld in the refrigerator overnight. Start by preparing the creamy base and layering the vanilla wafers, bananas, and strawberries as outlined in the recipe. Cover it tightly to maintain freshness, refrigerating for up to 3 days. When it’s time to serve, simply add the whipped topping right before presenting it to guests for that light, fluffy finish. With these make-ahead tips, you’ll be able to impress everyone with a delicious dessert that’s just as delightful as if it were freshly made!
Expert Tips for Strawberry Banana Pudding Dream
-
Make Ahead: Prepare your Strawberry Banana Pudding Dream a day before serving for improved flavor and texture. It benefits from an overnight chill!
-
Fruit Freshness: Use ripe bananas for optimal sweetness and flavor. Overripe bananas may turn mushy, so choose wisely!
-
Whipped Topping Alternatives: For a homemade touch, whip fresh cream for a richer topping, or opt for non-dairy alternatives to cater to dietary needs.
-
Layering Strategy: Layer ingredients carefully to prevent soggy wafers. Allow each layer to set before adding the next for the best texture.
-
Chill Time Matters: Be patient! Refrigerating for at least 4 hours allows the flavors to meld and enhances the overall taste of your Strawberry Banana Pudding Dream.
Strawberry Banana Pudding Dream Recipe FAQs
How do I choose the right bananas for this recipe?
Absolutely! For the best flavor and texture in your Strawberry Banana Pudding Dream, use ripe bananas that have a firm texture and a slightly yellow skin with minimal brown spots. These will provide the perfect balance of sweetness and prevent them from becoming mushy in the pudding.
How long can I store my Strawberry Banana Pudding Dream in the refrigerator?
Very good question! You can keep your Strawberry Banana Pudding Dream covered in the refrigerator for up to 3 days. Just make sure to cover it tightly to prevent it from absorbing any odors from other foods.
Can I freeze this dessert?
The more the merrier! Yes, you can freeze your Strawberry Banana Pudding Dream for up to 1 month. To do this, wrap the container tightly in plastic wrap and then in foil to prevent freezer burn. When you’re ready to enjoy it, simply thaw it overnight in the refrigerator.
What should I do if my pudding mixture is lumpy?
Don’t worry, that can happen! If your pudding mixture ends up lumpy, just continue mixing it for an extra minute or two. You can also use a whisk or a hand mixer to break up any lumps until the texture is smooth and creamy. If the lumps persist, you may want to strain the mixture through a fine sieve for a perfect consistency.
Are there any dietary considerations I should keep in mind?
Very much so! This recipe can be adapted for gluten-free diets by using gluten-free vanilla wafers. Additionally, if you’re catering to dairy-free diets, substitute the cream cheese and whipped topping with non-dairy options like coconut cream or silken tofu blended until smooth.
Can I prepare this dessert a day ahead of time?
Absolutely! In fact, making the Strawberry Banana Pudding Dream the day before serving is highly recommended. This allows the flavors to meld beautifully, enhancing the overall taste and texture. Just be sure to store it covered in the fridge to maintain its freshness!
Strawberry Banana Pudding Dream: The Ultimate No-Bake Delight
Ingredients
Equipment
Method
- In a large mixing bowl, use an electric mixer to combine cream cheese and sweetened condensed milk until creamy and smooth, about 2 minutes.
- Add pudding mix and milk to the creamy base. Mix for an additional 2-3 minutes until fully combined and pudding thickens.
- Place an even layer of vanilla wafers at the bottom of a serving dish or trifle bowl.
- Layer sliced bananas over the vanilla wafers, followed by a layer of fresh strawberries.
- Pour half of the pudding mixture over the layered fruit, smoothing it with a spatula.
- Repeat by adding another layer of vanilla wafers, remaining sliced bananas, and strawberries, then pour the remaining pudding mixture on top.
- Spread whipped topping evenly over the top layer of pudding and smooth it out.
- Cover the dish with plastic wrap and refrigerate for at least 4 hours or overnight.
Leave a Reply