
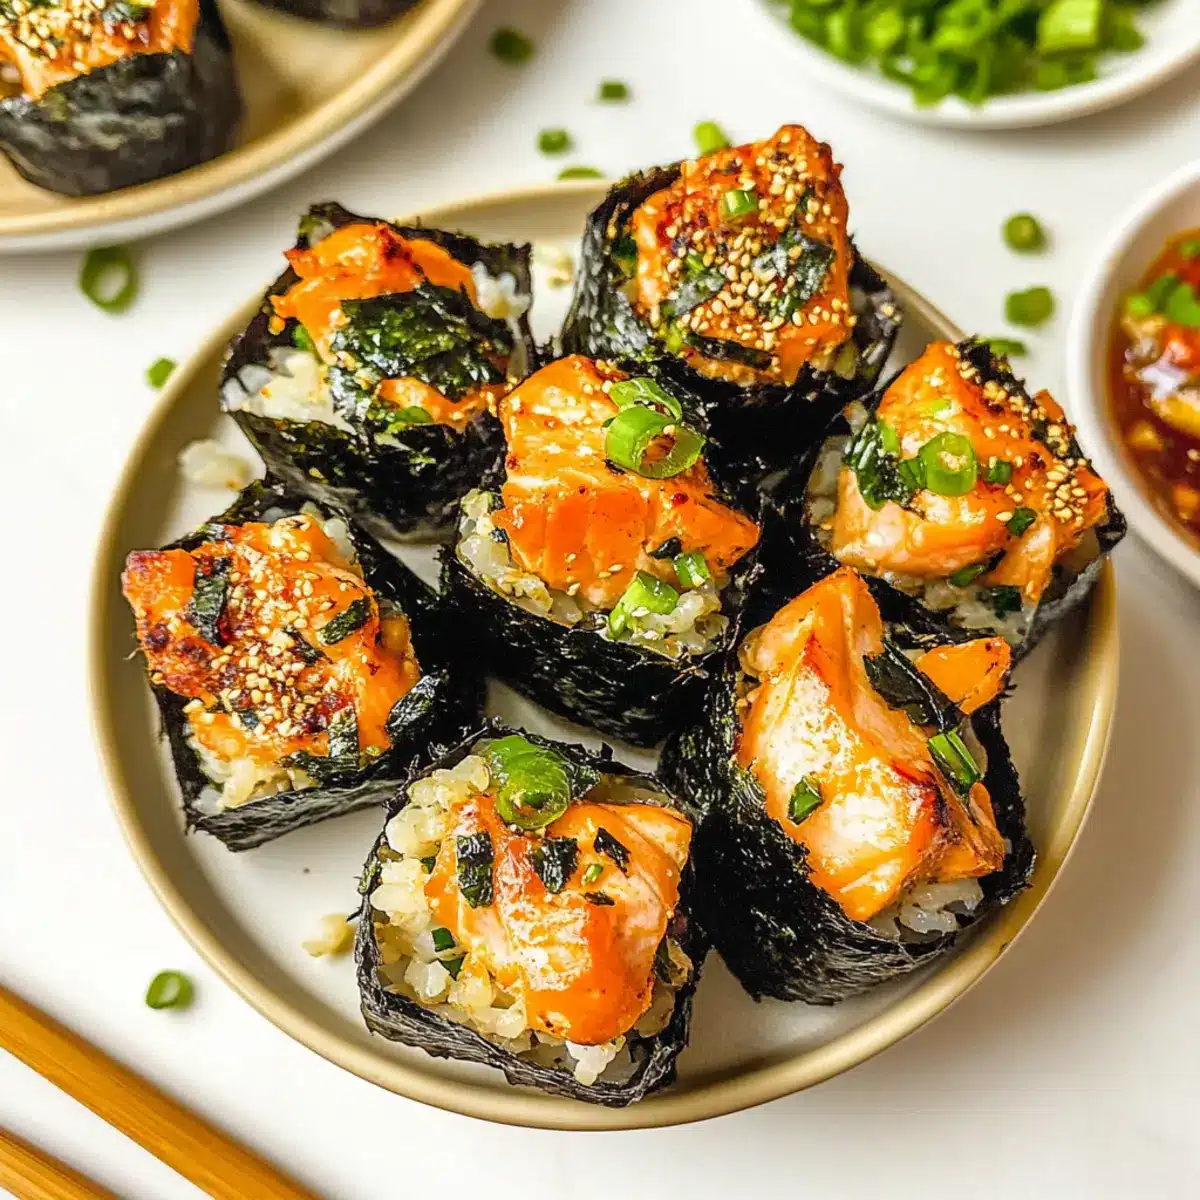
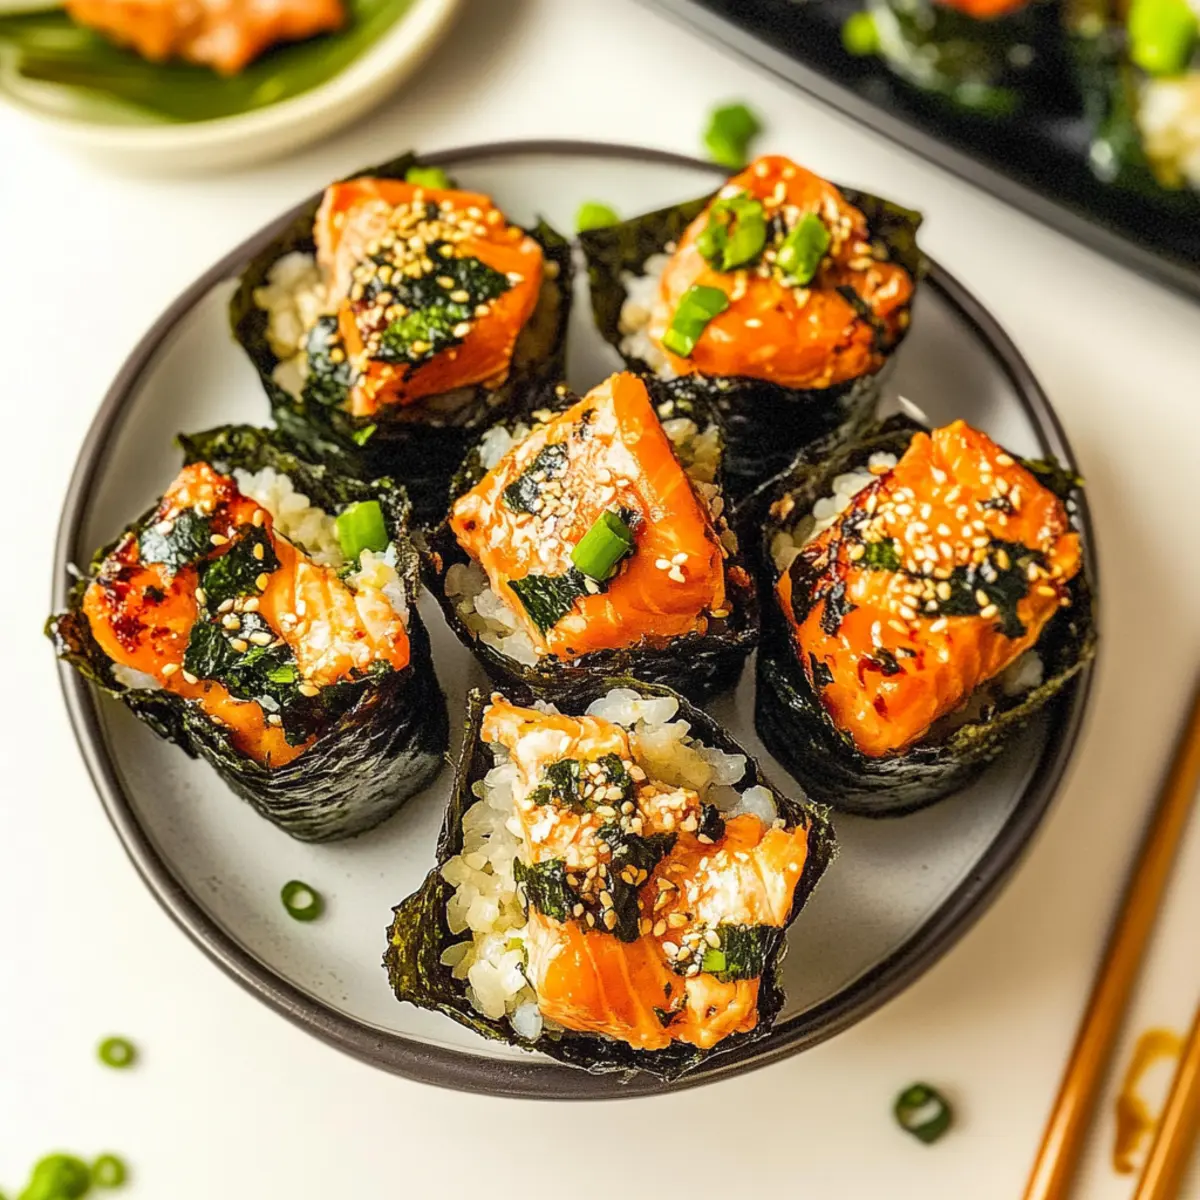
As I shuffled through my kitchen one evening, I found myself wishing I could enjoy sushi without the hassle of rolling it up. That’s when the idea for Easy Baked Salmon Sushi Cups struck me—a playful take on traditional sushi, but in a chic, bite-sized form! These cups combine flaky, tender salmon with savory sushi rice, all nestled in crispy nori, making them perfect appetizers for gatherings or a delightful snack for a quiet night in. Not only are they quick to whip up, but they also offer an exciting way to impress your guests without spending hours in the kitchen. Ready to dive into a sushi experience like no other? Let’s get started!

Why Are These Sushi Cups So Irresistible?
Simplicity: With just a few easy steps, these cups come together quickly, making them a perfect choice for busy weeknights or last-minute gatherings.
Flavor Explosion: The combination of fresh salmon and zesty Kewpie mayo provides a delicious umami kick that will tantalize your taste buds.
Crowd-Pleaser: Whether for a party or a cozy dinner, they’re sure to impress your guests, much like my Cheesy Baked Ziti.
Versatility: Feel free to customize with flavors like avocado or crab, making it a dish that suits everyone’s palate!
Creative Serving: These cups serve beautifully with sauces and sides; pair them with an easy Asian Cucumber Salad for a refreshing side!
Easy Baked Salmon Sushi Cups Ingredients
For the Salmon Mixture
• Salmon – A fresh or frozen, sushi-grade salmon is key for flavor and safety.
• Light Soy Sauce – This ingredient brings umami depth; swap with tamari for a gluten-free twist.
• Kewpie Mayo – Enhances creaminess; regular mayo can work in a pinch if Kewpie is unavailable.
• Sriracha – Adds a spicy kick; adjust to your heat preference, or substitute with a milder sauce if desired.
• Sesame Oil – Infuses a nutty flavor; can be replaced with olive oil, but flavor will slightly differ.
For the Sushi Rice
• Sushi Rice – Use this sticky rice to ensure the cups hold their structure; avoid substituting with long-grain varieties.
• Rice Vinegar – Provides necessary sweetness and acidity; replace with white vinegar while adjusting sweetness level.
• White Sugar – Balances the tanginess of the vinegar; honey or agave syrup can make a natural substitute, considering liquid ratios.
For the Sushi Cups
• Nori Sheets – Structural foundation for the cups; cut to fit muffin tin; cucumber slices can replace for a low-carb option.
• Furikake – A delightful Japanese seasoning to add flavor and texture; omit if you can’t find it or use sesame seeds instead.
• Green Onion – Fresh and crunchy garnish; you can switch to chives for a similar taste.
For Assembly
• Cooking Spray – Helpful for greasing the muffin tin; olive oil works well as an alternative.
These Easy Baked Salmon Sushi Cups are not just an appetizer; they’re a fun and exciting way to enjoy sushi flavors!
Step‑by‑Step Instructions for Easy Baked Salmon Sushi Cups
Step 1: Prepare the Sushi Rice
Start by cooking the sushi rice according to the package instructions, usually about 20 minutes. Once cooked, transfer the rice to a mixing bowl, then gently fold in rice vinegar and sugar. Allow the mixture to cool slightly, ensuring the sticky rice is perfectly seasoned and ready to form the base for your Easy Baked Salmon Sushi Cups.
Step 2: Preheat the Oven and Prepare the Salmon
Preheat your oven to 400°F (200°C). While it heats up, dice the fresh salmon into small chunks, then place it in a mixing bowl. Add light soy sauce, Kewpie mayo, sriracha, and sesame oil, stirring until the salmon is completely coated in the flavorful mixture. This will bring a delicious umami taste to your sushi cups.
Step 3: Prepare the Nori Sheets
Take your nori sheets and cut them into squares, large enough to fit into the muffin tins. You will need about 10–12 squares, depending on your tin’s capacity. These sheets will provide a crispy foundation for your Easy Baked Salmon Sushi Cups, creating the perfect base for the rice and salmon filling.
Step 4: Assemble the Sushi Cups
Using cooking spray, lightly grease the muffin tin compartments to prevent sticking. Place a square of nori into each compartment, then add a spoonful of sushi rice, gently pressing it down to form a solid layer. Top each rice layer with a generous portion of the salmon mixture, ensuring even distribution among all the cups.
Step 5: Bake the Sushi Cups
Once assembled, put the muffin tin in the preheated oven and bake for about 15 minutes. Look for the salmon to be cooked through and the tops to develop a golden appearance. This baking time ensures that the flavors meld beautifully, and the nori becomes delightfully crispy.
Step 6: Garnish and Serve
After baking, carefully remove the sushi cups from the oven and let them cool for a few minutes. For an extra touch, drizzle with additional sriracha or mayo, then sprinkle furikake and finely chopped green onions on top. These finishing touches elevate your Easy Baked Salmon Sushi Cups, making them even more enticing when served warm!
Storage Tips for Easy Baked Salmon Sushi Cups
Room Temperature: Enjoy these sushi cups immediately for the best flavor and texture. However, if left out, they should not sit at room temperature for more than 2 hours.
Fridge: Store any leftovers in an airtight container in the fridge for up to 2-3 days. Ensure they are completely cooled before sealing to maintain moisture.
Freezer: You can freeze these cups, but for the best quality, consume them within 2 months. Wrap each cup tightly in plastic wrap, then place in a freezer bag.
Reheating: For optimal taste, reheat the Easy Baked Salmon Sushi Cups in the oven at 350°F (175°C) for about 10 minutes, or until warmed through. Alternatively, you can microwave them on medium until heated.
Expert Tips for Easy Baked Salmon Sushi Cups
Fresh Salmon: Ensure you use sushi-grade salmon for safety and the best flavor. Avoid any lower-quality fish.
Cool Before Serving: Let the sushi cups cool slightly after baking; this helps prevent burns from the hot filling.
Watch the Bake Time: Start checking for doneness at the 12-minute mark to avoid overcooking the salmon in your Easy Baked Salmon Sushi Cups.
Nori Handling: Be gentle when placing nori in the muffin tin, as rough handling can cause tears and leaks.
Mix Thoroughly: Make sure you mix the salmon thoroughly with the sauces to ensure every bite is packed with flavor.
What to Serve with Easy Baked Salmon Sushi Cups
Elevate your sushi experience with perfect pairings that enhance the light, savory goodness of these delightful cups.
-
Pickled Ginger: This traditional accompaniment adds a sharp, refreshing bite that contrasts beautifully with the rich salmon.
-
Soy Sauce: A drizzle of soy sauce brings umami complexity, deepening the flavors of the sushi cups and making each bite exquisite.
-
Cucumber Salad: Crisp and refreshing, this salad complements the warm sushi cups with its crunchy texture and bright, zesty flavors.
-
Wasabi: For those who enjoy a kick of heat, a dab of wasabi elevates the entire experience and tempts the adventurous palate.
-
Miso Soup: A cozy bowl of miso soup brings warmth and comfort, creating a wholesome meal that balances the lighter sushi. The savory broth beautifully contrasts the textures in every bite.
-
Edamame: These tender, lightly salted soybeans offer a nutritious and satisfying snack that pairs well with the seafood flavors. Packed with protein, they make for a fulfilling accompaniment.
-
Sake or Japanese Beer: Enjoy these sushi cups with a glass of sake or a cold Japanese lager to embrace the full sushi experience—perfect harmony in every bite and sip!
-
Chocolate Mochi: To finish off your meal on a sweet note, serve chocolate mochi. Its chewy texture and rich flavor create a delightful contrast and a playful end to the sushi adventure.
Easy Baked Salmon Sushi Cups Variations
Feel free to unleash your creativity with these options for perfecting your sushi cups experience!
-
Seafood Swaps: Replace salmon with crab or shrimp for a delightful twist; each provides a unique flavor while maintaining the dish’s essence. Feel free to experiment with your favorite seafood for a whole new take!
-
Avocado Love: Add sliced avocado for creaminess and freshness; it’s a flavorful complement to the other ingredients. The buttery texture elevates your sushi cups to the next level of deliciousness!
-
Vegetarian Delight: Use roasted veggies or a mix of finely chopped mushrooms as a hearty filling; the earthy flavors contrast beautifully with sushi rice. It’s a great way to impress your vegetarian friends!
-
Extra Crunch: Toss in crispy tempura bits for texture; they’ll add a delightful crunch that contrasts with the soft filling. Your guests will be amazed by the unexpected surprise in each bite!
-
Milder Heat: Swap sriracha for a milder chili sauce or even a sweet soy glaze if spice isn’t your thing. This super simple switch still keeps the flavor profile intact while pleasing those who prefer less heat.
-
Garnish Variety: Experiment with toppings like pickled ginger or even a sprinkle of togarashi for a bit of zest. Each new sprinkle transforms your cups, creating a fun, personalized experience!
-
Cucumber Cups: For a low-carb twist, substitute nori with cucumber slices; they provide a refreshing bite that wonderfully contrasts the savory filling. This variation is perfect for those looking for a lighter option!
Pair these delightful sushi cups with an accompanying dish like my easy Asian Cucumber Salad for a full meal experience. Each variation adds an exciting dimension, ensuring your sushi cups are always a hit!
Make Ahead Options
These Easy Baked Salmon Sushi Cups are perfect for meal prep, saving you valuable time during busy weeknights! You can prepare the sushi rice and salmon mixture up to 24 hours in advance, storing them separately in airtight containers in the refrigerator. This prevents the nori from becoming soggy and maintains the quality of the ingredients. When you’re ready to cook, simply assemble the cups by placing nori in the muffin tin, adding rice, and topping with the prepped salmon mixture. Bake according to the recipe instructions and enjoy your sushi cups just as delicious as if they were freshly made!

Easy Baked Salmon Sushi Cups Recipe FAQs
What type of salmon should I use for these sushi cups?
Absolutely, it’s crucial to use sushi-grade salmon for the best flavor and safety. Look for fresh or frozen salmon labeled as “sushi-grade” at your seafood market. This ensures that the fish has been handled and stored properly, making it safe for consumption raw or lightly cooked.
How should I store leftover sushi cups?
Leftovers can be stored in an airtight container in the fridge for up to 2-3 days. It’s important to let them cool completely before sealing, as this helps maintain their moisture. If you want to keep them longer, consider freezing—though I recommend consuming them within 2 months for the best quality!
Can I freeze Easy Baked Salmon Sushi Cups?
Yes, you can freeze these delicious cups! Wrap each sushi cup tightly in plastic wrap to avoid freezer burn, then place them in a freezer bag. For optimal taste, try to use them within 2 months. When ready to eat, thaw in the fridge overnight and reheat in the oven at 350°F for about 10 minutes.
What should I do if my sushi cups fall apart?
Very! If your sushi cups start falling apart, it might be due to not using enough sushi rice or not pressing them firmly enough in the muffin tin. Make sure you firmly press the rice to create a solid base, and ensure you’re using the right type of rice that’s sticky enough to hold together.
Are there any allergy considerations for this recipe?
Of course! This recipe involves seafood, so if anyone has a fish allergy, it’s best to substitute the salmon with another protein like crab or cooked shrimp. You can also adjust the soy sauce to use a gluten-free variant if gluten is a concern. Always check ingredient labels to ensure they meet your dietary needs!
How can I enhance the flavor of my sushi cups?
Consider experimenting with the toppings! Adding ingredients like pickled ginger, avocado slices, or fresh cilantro can bring new layers of flavor and freshness. You might also try adjusting the sriracha to your desired spice level or adding extra seasonings, like sesame seeds, for a crunchy finish.
Easy Baked Salmon Sushi Cups for a Quick Flavor Fix
Ingredients
Equipment
Method
- Prepare the sushi rice by cooking according to package instructions, about 20 minutes. Fold in rice vinegar and sugar; cool slightly.
- Preheat oven to 400°F (200°C). Dice salmon, mix with soy sauce, Kewpie mayo, sriracha, and sesame oil until coated.
- Cut nori sheets into squares to fit muffin tin, about 10-12 squares needed.
- Grease muffin tin compartments with cooking spray. Place nori into each, add sushi rice, press down, and top with salmon mixture.
- Bake in preheated oven for about 15 minutes until salmon is cooked and the tops are golden.
- Let cool for a few minutes, drizzle with sriracha or mayo, and sprinkle furikake and green onions before serving.
Leave a Reply