
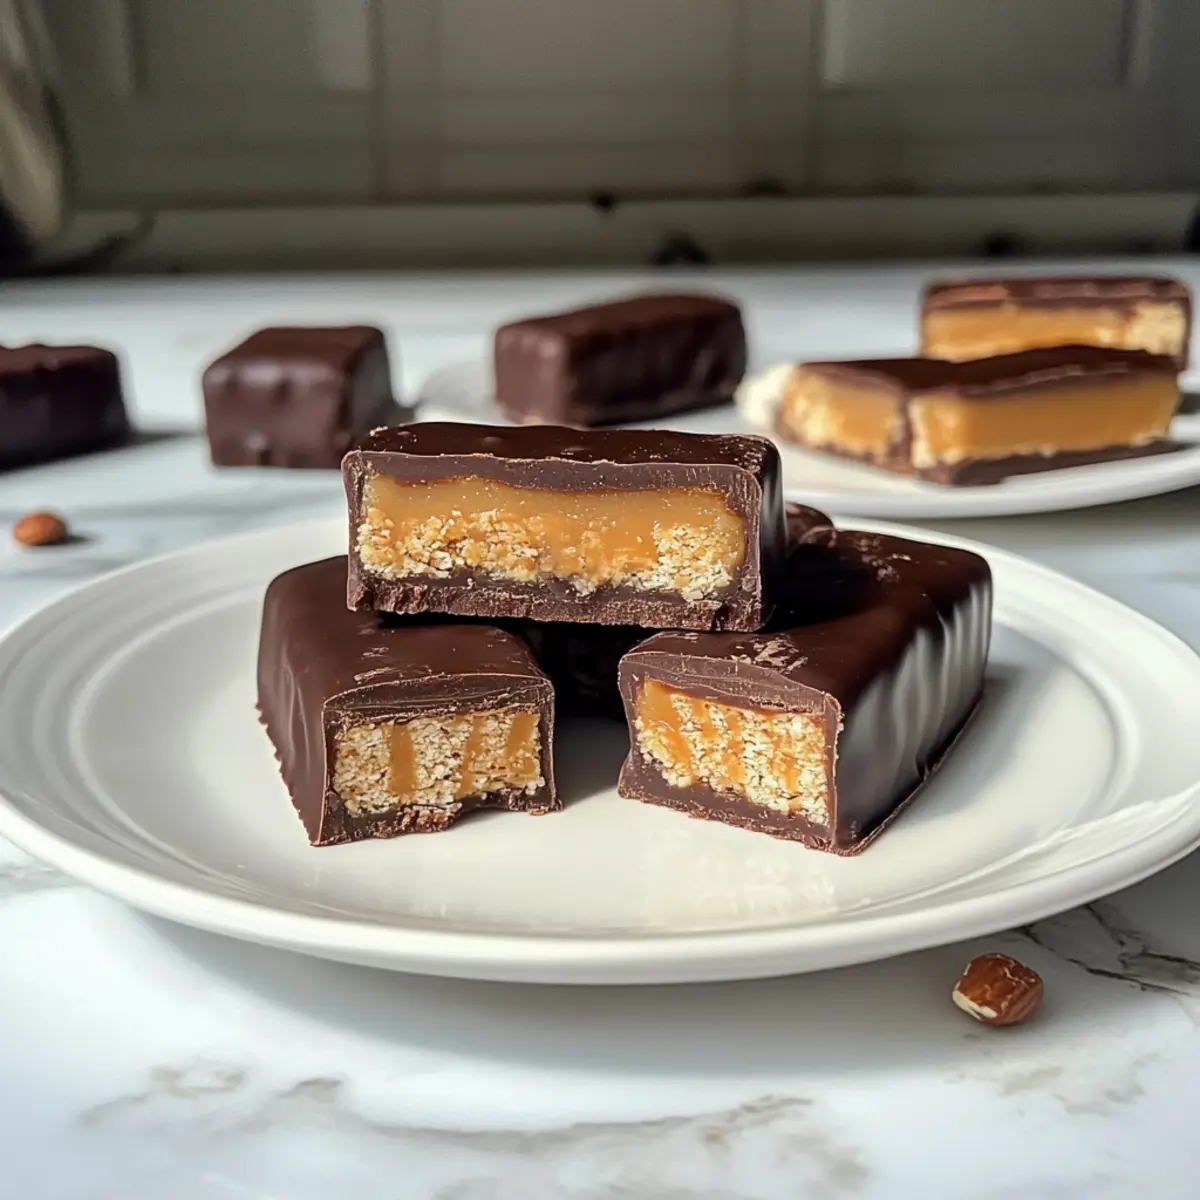
As I stirred the ingredients together, a hint of nostalgia washed over me—these Healthy Twix Bars are my modern twist on a childhood favorite. With a crispy almond flour base, creamy peanut butter caramel, and a luscious dark chocolate coating, they deliver a satisfying sweetness without the guilt. Perfect for those of us seeking a deliciously indulgent dessert that’s also gluten-free and healthy! The best part? They require no baking, making them a breeze to whip up when a craving strikes. Whether you’re looking for a kid-friendly snack or a delightful treat for your next gathering, these bars are your answer. Are you ready to embrace a healthier dessert option that still feels like a treat?

Why are these bars a healthier choice?
Nostalgia Meets Health: These Healthy Twix Bars recreate the beloved candy experience with wholesome ingredients.
No-Bake Convenience: Perfect for busy weekdays, these bars come together quickly without the need for baking.
Customizable Options: Use almond flour, oat flour, or even swap nut butters to tailor the recipe to your taste or dietary needs.
Guilt-Free Indulgence: Enjoy a delectable blend of flavors and textures, all while packing in protein and healthy fats.
Crowd-Pleasing Delight: These bars are perfect for parties or as a snack, sure to impress everyone from kids to adults!
Feeling inspired? Try serving them alongside a healthy snack like Healthy Tuna Melt or treat the family with some Cereal Bars Homemade.
Healthy Twix Bars Ingredients
For the Shortbread Base
• Almond Flour – Provides structure and a nutty flavor; substitute with oat flour or sunflower seed flour for a nut-free option.
• Butter – Adds richness and helps bind the crust; can be replaced with coconut oil or a plant-based butter for a dairy-free alternative.
• Maple Syrup – Sweetens the shortbread and caramel filling; substitute with honey or agave syrup for varying sweetness profiles.
• Vanilla Extract – Enhances flavor depth; can be swapped with almond extract or maple extract for a different taste.
• Salt – Balances sweetness; use sea salt or Himalayan salt for flavor enhancement.
For the Caramel Filling
• Creamy Peanut Butter – Acts as the main component of the caramel filling; substitute with almond or cashew butter for a different flavor.
• Extra Maple Syrup – Provides additional sweetness for the caramel; can also be swapped out for honey or agave.
For the Chocolate Coating
• Chocolate Chips – Forms the coating and provides a rich chocolate flavor; use dairy-free dark chocolate for a vegan alternative or cacao nibs for less sweetness.
• Coconut Oil – Helps melt the chocolate smoothly; replace with butter or another oil, but adjust quantities as needed.
Indulge in these delicious Healthy Twix Bars, giving your taste buds a treat without the guilt!
Step‑by‑Step Instructions for Healthy Twix Bars
Step 1: Preheat the Oven
Begin by preheating your oven to 350°F (175°C). While the oven heats, line an 8×8 inch baking pan with parchment paper, allowing it to overhang slightly for easy removal later. This will ensure your Healthy Twix Bars can be lifted out smoothly once they are set.
Step 2: Prepare the Shortbread Base
In a mixing bowl, stir together almond flour, melted butter, maple syrup, vanilla extract, and salt until well combined. You should achieve a dough-like consistency that holds together. Press this mixture evenly into the prepared baking pan, creating a flat layer. Bake for 10-12 minutes, or until the top turns golden brown. Remove from the oven and let cool completely.
Step 3: Make the Caramel Filling
In a separate bowl, combine creamy peanut butter, an extra splash of maple syrup, vanilla extract, and a bit of almond flour. Mix until the texture is creamy and homogenous. Once the shortbread base has cooled, spread this luscious peanut butter caramel over the top evenly, ensuring it reaches the edges. Place the pan in the freezer for at least 1 hour to firm up the filling.
Step 4: Prepare the Chocolate Coating
While the caramel filling is setting, melt the chocolate chips along with coconut oil. You can do this by placing them in a heatproof bowl over simmering water or microwaving them in short bursts, stirring until completely smooth. Once melted, remove the bowl from heat and allow it to cool slightly while you prepare for the next step.
Step 5: Assemble the Bars
After the caramel has firmed up in the freezer, take the pan out and carefully lift the set filling using the parchment overhang. Place it on a cutting board and slice it into 16 equal bars, making sure the cuts are clean for a neat appearance.
Step 6: Coat the Bars
Take each bar and dip it into the melted chocolate, ensuring it is fully coated. Gently shake off any excess chocolate before placing each bar on a parchment-lined tray. Set the tray aside, allowing the chocolate to set slightly while you continue the coating process.
Step 7: Final Touch
If desired, drizzle any remaining melted chocolate over the bars for added flair and sprinkle with flaky sea salt for a hint of crunch and flavor contrast. Place the tray in the freezer for about 10 minutes to allow the chocolate coating to set completely and firm up all layers.
Step 8: Store the Bars
Once set, store your delicious Healthy Twix Bars in an airtight container in the refrigerator for up to 2 weeks, or freeze individual bars for longer preservation. Enjoy these guilt-free treats anytime you crave a sweet, satisfying snack!
Expert Tips for Healthy Twix Bars
-
Firm Pressing: Ensure you press the shortbread mixture firmly into the pan to avoid a crumbly texture in your Healthy Twix Bars.
-
Cooling Time: Allow each layer to cool completely before adding the next; this guarantees clean cuts and prevents the layers from mixing.
-
Chocolate Quality: Use high-quality dark chocolate with at least 70% cocoa for the best flavor and smooth melting consistency in your chocolate coating.
-
Ingredient Substitutions: Don’t hesitate to experiment with different nut butters or sweeteners; this can enhance the flavors and better tailor the Healthy Twix Bars to your dietary preferences.
-
Chill for Neat Cuts: Freezing the bars for a few minutes after coating them makes it easier to cut them into neat pieces without ruining the presentation.
How to Store and Freeze Healthy Twix Bars
Fridge: Store your Healthy Twix Bars in an airtight container in the refrigerator for up to 2 weeks to maintain freshness and flavor.
Freezer: For longer preservation, freeze individual bars wrapped in parchment paper or in a freezer-safe container for up to 3 months.
Reheating: Pop the bars in the fridge to thaw when ready to enjoy. For a delicious treat, let them warm to room temperature; this enhances the flavors!
Serving: These bars can be enjoyed straight from the fridge or freezer, making them a convenient, healthy snack option anytime.
What to Serve with Healthy Twix Bars
Delight in the sweetness of a full meal with these indulgent yet nutritious treats that will leave you and your loved ones craving more.
-
Creamy Greek Yogurt: A dollop of Greek yogurt adds a refreshing tang, balancing the sweetness of the bars nicely. It also enhances the protein content of your snack.
-
Fresh Berries: Try pairing your bars with a medley of ripe strawberries, blueberries, or raspberries. Their juicy burst brings a vibrant flavor contrast, enriching your snack experience.
-
Nutty Granola: Serve alongside a crunchy granola, either sprinkled atop yogurt or enjoyed by itself. The toasted oats mingle beautifully with the creamy textures of the Twix bars.
-
Herbal Iced Tea: A refreshing glass of iced herbal tea offers a soothing sip that complements the rich flavors of the bars without overwhelming them.
-
Chocolate Protein Shake: For a decadent treat, blend up a chocolate protein shake. The smooth, chocolatey drink mirrors the bars, making it a mesmerizing match.
-
Sliced Apples with Almond Butter: Crisp apple slices paired with creamy almond butter introduce a delightful crunch and additional healthy fats, rounding out your healthy snacking adventure.
-
Coconut Macaroons: Enjoy these alongside coconut macaroons for a double dessert delight! The chewy coconut texture brings an additional homemade charm to the table.
-
Homemade Hot Chocolate: For a cozy treat, serve with a warm cup of homemade hot chocolate. This indulgent drink will turn your day into a sweet memory.
Healthy Twix Bars Variations & Substitutions
Feel free to get creative and customize these Healthy Twix Bars to suit your taste and dietary needs!
-
Nut-Free: Swap almond flour for oat flour or sunflower seed flour to make these bars nut-free without compromising the delicious flavor.
-
Dairy-Free: Replace butter with coconut oil or a plant-based butter to keep your treat dairy-free and just as indulgent.
-
Sweetness Switch: Use honey or agave syrup in place of maple syrup for a different sweetness profile. Each choice brings a lovely flavor twist!
-
Flavor Infusion: Swap out vanilla extract for almond extract or maple extract for an exciting flavor variation that surprises the palate.
-
Alternative Nut Butters: Experiment with almond butter or cashew butter instead of peanut butter to create unique flavor profiles that suit your preference.
-
Lower Carb: To make these bars low-carb, opt for a keto-friendly sweetener and use coconut flour in moderation for a grain-free alternative.
-
Dark Chocolate Delight: For richer flavor, use high-quality dairy-free dark chocolate or mix in cacao nibs for less sweetness and a delightful crunch.
-
Add a Dash of Heat: Enhance the flavor with a sprinkle of sea salt or a dash of cayenne pepper in the caramel for a surprising heat that balances the sweetness beautifully.
Once you’ve crafted your perfect variation, why not pair your Healthy Twix Bars with a refreshing beverage? Try them with a delicious cup of Healthy Pumpkin Chia for a delightful pairing!
Make Ahead Options
These Healthy Twix Bars are perfect for meal prep, allowing you to enjoy a guilt-free treat anytime! You can prepare the shortbread base and caramel filling up to 24 hours in advance; simply bake the base, let it cool, and layer on the peanut butter caramel. Cover tightly with plastic wrap or foil for maximum freshness, preventing any browning or drying out. When you’re ready to enjoy your bars, melt the chocolate and coat each piece just before serving for the best texture and taste. This way, you’ll have delicious Healthy Twix Bars ready in no time, making your busy weeknights a little sweeter!
Healthy Gluten-Free Twix Bars Recipe FAQs
How do I choose the best almond flour for making Healthy Twix Bars?
Absolutely! For the best results, look for finely ground almond flour that is blanched, as it provides a smooth texture for your shortbread base. Avoid almond meal, which is coarser and can lead to a gritty texture. If you’re aiming for nut-free options, oat flour is a fantastic substitute, giving you a similar structure!
What is the best way to store Healthy Twix Bars?
You can store your Healthy Twix Bars in an airtight container in the refrigerator for up to 2 weeks. To keep them fresh and delicious, layer them with parchment paper to prevent sticking. If you end up with leftovers, freezing them is an excellent option! Individually wrap the bars in parchment paper, place them in a freezer-safe container, and they will last for up to 3 months.
Can I freeze Healthy Twix Bars? If so, how?
Yes, you can easily freeze these delicious bars! After preparing and cooling them, wrap each bar in parchment paper to prevent freezer burn. Place the wrapped bars in a freezer-safe container or zip-top bag. When you’re ready to eat, simply thaw them in the fridge overnight, or at room temperature for about 30 minutes, and they’ll be perfect!
What should I do if my chocolate coating is too thick?
If you find that your chocolate coating is too thick to dip your bars properly, no worries! Simply return the bowl to gentle heat and stir in a teaspoon of coconut oil to thin it out. This will help achieve a smooth, even coating. And if you accidentally have leftover melted chocolate, drizzle it on top of your bars for a tasty finishing touch!
Are there any allergens I should be aware of with these Healthy Twix Bars?
Definitely, it’s important to know your ingredients! The main allergens are nuts, since almond flour and peanut butter are used. For nut-free alternatives, you can substitute almond flour with oat flour or sunflower seed flour and go for sunbutter instead of peanut butter. Always check labels if you have allergies, especially for chocolate brands, as they may contain traces of nuts or dairy.
Can I make a vegan version of these Healthy Twix Bars?
Very much so! To create a vegan version, simply use plant-based butter or coconut oil instead of regular butter, and replace honey with agave syrup or maple syrup. Also, ensure that your chocolate is dairy-free. Stick to high-quality dark chocolate with at least 70% cocoa, and you’ll have a delightful vegan treat that everyone can enjoy!
Irresistibly Healthy Twix Bars You Can Make at Home
Ingredients
Equipment
Method
- Preheat your oven to 350°F (175°C) and line an 8x8 inch baking pan with parchment paper.
- In a mixing bowl, stir together almond flour, melted butter, maple syrup, vanilla extract, and salt until well combined. Press mixture into the prepared baking pan and bake for 10-12 minutes until golden brown. Let cool completely.
- In a separate bowl, combine creamy peanut butter, extra maple syrup, vanilla extract, and a bit of almond flour. Mix until creamy and spread over cooled shortbread base. Freeze for at least 1 hour.
- Melt chocolate chips and coconut oil in a heatproof bowl over simmering water or in the microwave until smooth. Allow to cool slightly.
- Lift the filled shortbread from the freezer, slice into 16 equal bars, and dip each bar into the melted chocolate, ensuring full coverage.
- Place each coated bar on a parchment-lined tray and drizzle with remaining melted chocolate and sprinkle with flaky sea salt if desired. Freeze for about 10 minutes until chocolate is set.
- Store in an airtight container in the refrigerator for up to 2 weeks or freeze individual bars for longer preservation.
Leave a Reply