
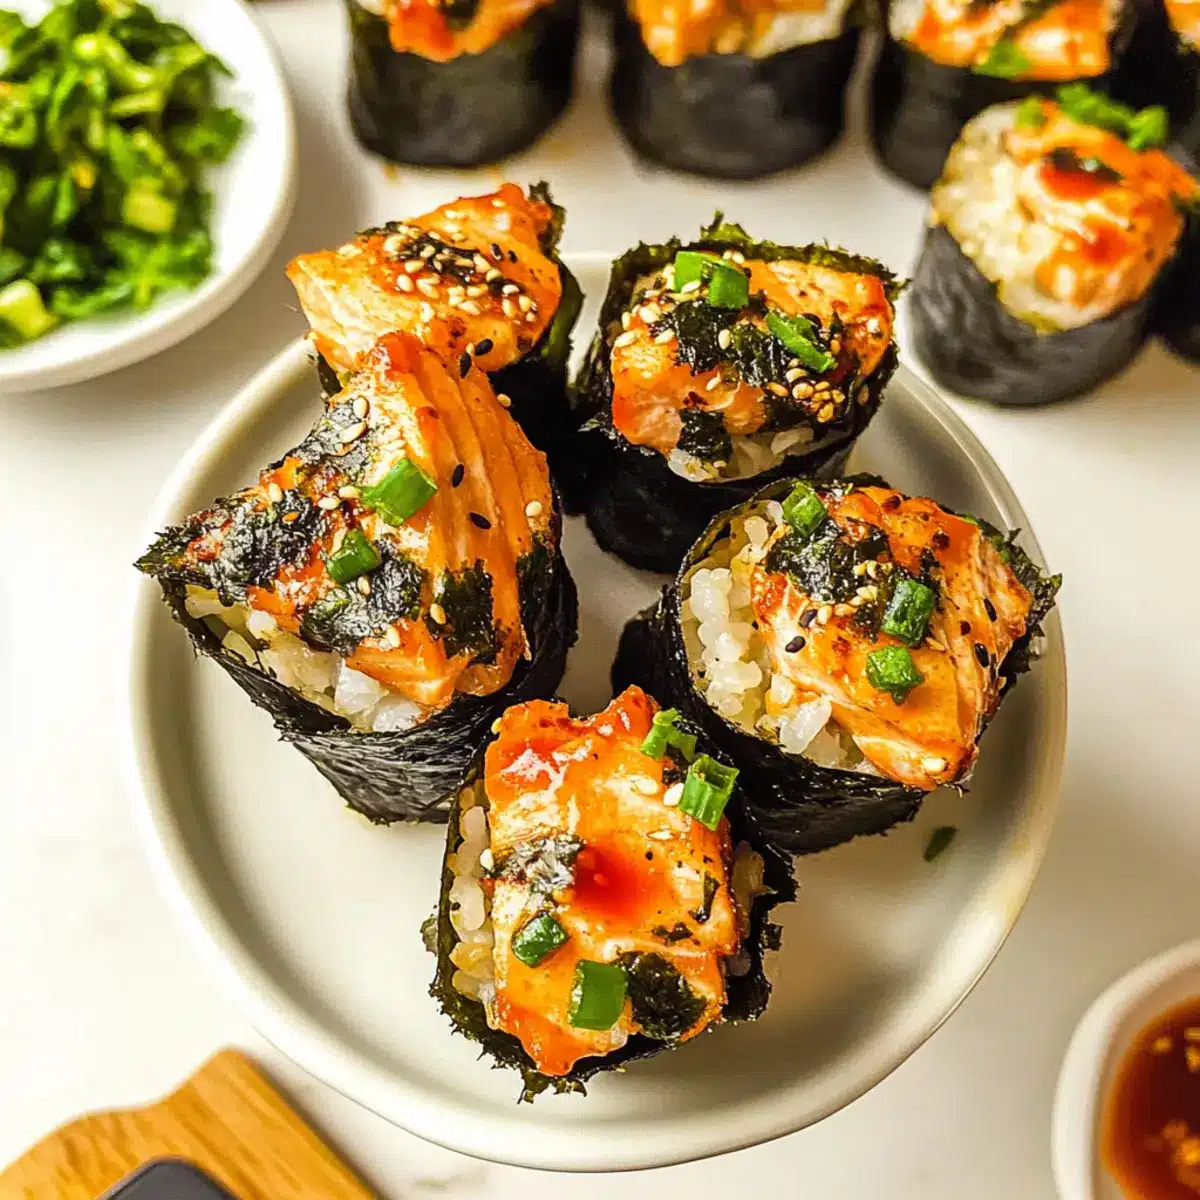
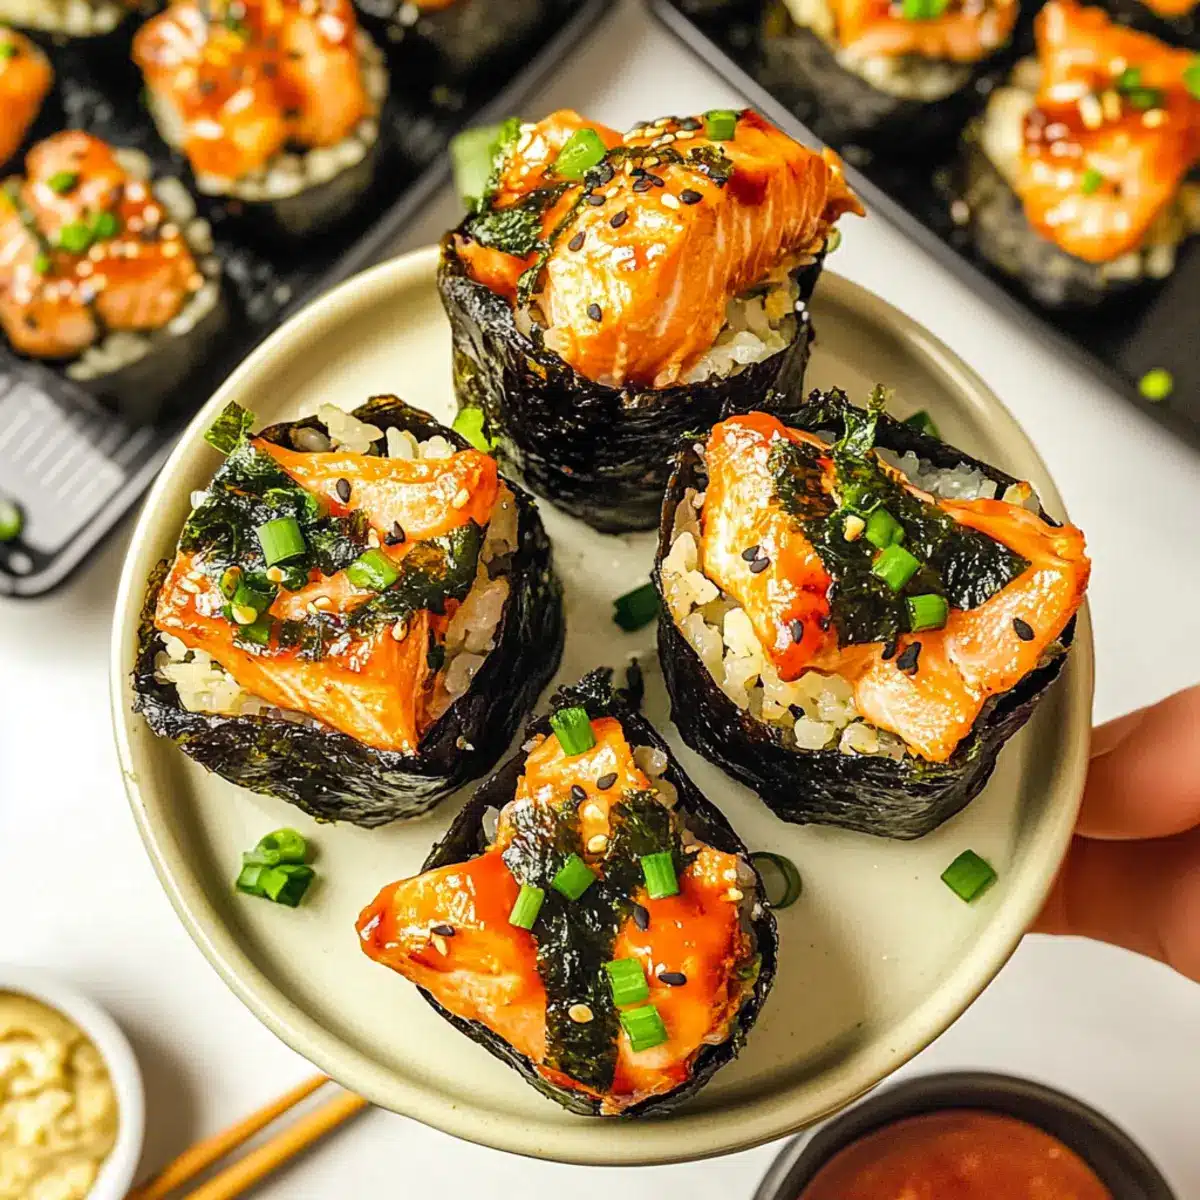
Have you ever craved sushi but found yourself short on time or kitchen skills? Enter my Easy Baked Salmon Sushi Cups—a delightful solution that combines all the flavors you love in sushi, minus the fuss. Picture tender salmon mingling with perfectly cooked sushi rice, all snugly nestled in crispy nori. What makes these cups a standout is not just their amazing taste, but also their sheer convenience; they’re a breeze to whip up and perfect for any occasion, from casual snacks to impressive appetizers. Plus, they invite creativity—feel free to adjust the toppings to suit your taste! Ready to savor a unique twist on sushi? Let’s dive into this mouthwatering recipe together!

Why Are Sushi Cups So Irresistible?
Versatile enough for any occasion, these Easy Baked Salmon Sushi Cups can easily transform from casual snacks to show-stopping appetizers. Quick and easy to prepare, you’ll have a delightful dish in under 30 minutes! Crispy nori adds a satisfying crunch that perfectly balances the tender salmon and chewy sushi rice. Plus, customizable toppings let you tailor each cup to your taste—try adding spicy mayo or fresh herbs just like I do in my Broccoli Cheese Cups for an extra kick! If you’re looking for a flavorful appetizer that’s both fun and easy to make, these sushi cups are your new go-to.
Easy Baked Salmon Sushi Cups Ingredients
For the Salmon Filling
- Salmon – Fresh, cubed salmon is recommended for the best flavor and texture; canned salmon can be an alternative if pressed for time.
- Light Soy Sauce – Adds umami and depth; tamari is a great gluten-free substitute if needed.
- Kewpie Mayo – Enhances creaminess with a touch of sweetness; use regular mayonnaise but adjust seasoning to meet the original flavor.
- Sriracha – Infuses heat and flavor; feel free to reduce or swap for a milder hot sauce based on your spice preference.
- Sesame Oil – Brings a nutty taste that complements the sushi elements; can be replaced with olive oil if necessary.
For the Sushi Rice
- Uncooked Sushi Rice – Provides the essential base for the cups; short-grain is ideal for texture, while long-grain variations can be used if needed.
- Rice Vinegar – Balances the flavors in the rice; apple cider vinegar serves as a decent substitute.
- White Sugar – Counteracts the acidity in your rice mixture; try honey or agave syrup as a replacement if desired.
For Assembly
- Nori Sheets – Encases your sushi filling; consider using sesame leaves or lettuce for a fresh twist.
- Furikake – Japanese rice seasoning for garnish; while it’s optional, it’s recommended for that authentic taste.
- Green Onion – Adds freshness and color; can be swapped for chives or omitted if you prefer.
- Cooking Spray – Ideal for greasing your muffin tin; olive oil or butter can be used as alternatives.
These Easy Baked Salmon Sushi Cups come together with a delightful mix of fresh ingredients that offer flavor, texture, and creativity—all in one bite-sized treat! Enjoy crafting these scrumptious cups that will be the star of your next snack time or gathering.
Step‑by‑Step Instructions for Easy Baked Salmon Sushi Cups
Step 1: Cook Sushi Rice
Begin by cooking the uncooked sushi rice according to the package instructions, ensuring it’s tender and sticky. In a microwave-safe bowl, mix rice vinegar with white sugar and heat until the sugar dissolves. Once the rice is ready, fold in the vinegar mixture gently and set aside to cool while you prepare the other components.
Step 2: Prepare Salmon Mixture
In a mixing bowl, combine the cubed salmon, light soy sauce, Kewpie mayo, sriracha, and sesame oil. Stir until the ingredients are well incorporated, creating a creamy yet flavorful salmon mixture. Set this tasty filling aside, allowing the flavors to meld while you work on the next steps in making these Easy Baked Salmon Sushi Cups.
Step 3: Preheat Oven
Preheat your oven to 400°F (204°C) while you prepare the nori sheets and muffin tin. This temperature will ensure a perfectly baked texture, allowing for a deliciously golden finish. Grab your muffin tin and cooking spray, so everything is ready to go as you assemble the sushi cups.
Step 4: Prepare Nori Sheets
Take your nori sheets and cut them into squares that will fit into the muffin tin’s cups. The nori will form the exterior of your sushi cups, giving them a wonderful crispy texture. Make sure to have all your nori squares cut and ready for assembly, which will help streamline the next steps.
Step 5: Assemble Sushi Cups
Spray the muffin tin lightly with cooking spray to prevent sticking. Place a nori square into each muffin tin cup, pressing down gently. Next, pack about a tablespoon of the sushi rice into each nori-lined cup, followed by a generous spoonful of the prepared salmon mixture. Layer it nicely to ensure an even distribution in every bite.
Step 6: Bake
Place the assembled sushi cups in the preheated oven and bake for 15 minutes. You’ll know they are ready when the salmon turns opaque and the tops achieve a slightly golden color. Keep an eye on them as they bake to achieve the desired level of crispness in the nori.
Step 7: Garnish and Serve
Once baked, allow the sushi cups to cool slightly before transferring them to a serving platter. Drizzle with additional sriracha or Kewpie mayo, and sprinkle with furikake and chopped green onions for a fresh and vibrant finish. Serve your Easy Baked Salmon Sushi Cups warm and watch them disappear!
Expert Tips for Easy Baked Salmon Sushi Cups
- Fresh Salmon: Always use the freshest salmon to ensure safety and flavor. Avoid fish that’s been previously frozen for the best texture and taste.
- Don’t Overfill: Be mindful not to overfill the muffin tin; sushi cups need space to rise and create an airy texture during baking.
- Watch Cooking Time: Oven temperatures can vary. Keep an eye on your sushi cups to avoid overcooking, as they should be golden but not dry.
- Customize Toppings: Feel free to experiment with different toppings like avocado or spicy mayo to elevate the Easy Baked Salmon Sushi Cups to your liking!
- Perfect Nori Squares: Cut the nori sheets precisely so they fit snugly in the muffin tin. This will prevent any tears while assembling the cups.
- Cooling Time: Allow the sushi cups to cool slightly before serving; this helps the flavors settle and enhances the overall taste experience.
What to Serve with Easy Baked Salmon Sushi Cups
Elevate your sushi experience by pairing these delightful bites with captivating sides and drinks that enhance every flavor.
- Crispy Seaweed Salad: The light, refreshing crunch of seaweed pairs perfectly with the savory sushi cups, grounding your meal with contrasting textures.
- Pickled Ginger: A classic accompaniment, pickled ginger provides a zesty bite to cleanse the palate between your sushi cups; it’s essential for any sushi lover!
- Creamy Avocado Dip: This rich, smooth dip complements the sushi’s flavors beautifully and adds a luscious texture that harmonizes with the crispiness of the nori. Enjoy it as a delightful spread.
- Chilled Cucumber Salad: Cool, light, and crisp, a cucumber salad adds a fresh element to your meal, balancing the richness of the salmon. Drizzle with sesame dressing for extra flavor.
- Teriyaki Glazed Edamame: Sweet and savory, these tender edamame complement the sushi cups with a pop of flavor and a punch of protein, making them a satisfying snack.
- Lightly Sparkling Sake: Enhance your dining experience with a chilled glass of sparkling sake. Its effervescence and subtle sweetness elevate the sushi flavors while providing a delightful finish to your meal.
With these sides and drinks, your Easy Baked Salmon Sushi Cups will shine at any gathering, offering a well-rounded meal that tantalizes the taste buds!
Easy Baked Salmon Sushi Cups Variations
Feel free to let your creativity flow with these delicious twists and substitutions on your Easy Baked Salmon Sushi Cups!
-
Protein Options: Substitute salmon with shrimp, crab, or even tofu for a delightful vegetarian option. Each variant brings a unique flavor, adding a delightful surprise to your sushi cups.
-
Flavor Boost: Experiment with different sauces such as teriyaki or spicy mayo to enhance the flavor profile. Just like in my Cheesy Baked Ziti, varying sauces can take your dish to the next level!
-
Vegetable Add-ins: Add chopped veggies like bell peppers, cucumber, or avocado for extra texture and nutrition. Think about contrast—the crunch of fresh ingredients will elevate your sushi cups!
-
Herb Infusion: Incorporate fresh herbs like cilantro or basil for a garden-fresh twist. Herbs create a vibrant flavor boost that pairs perfectly with the umami of the salmon.
-
Gluten-Free Twist: Use gluten-free soy sauce or tamari instead of regular soy sauce for a gluten-free version. This way, everyone can join in on the sushi cup fun!
-
Spicy Kick: Want more heat? Add sliced jalapeños or a sprinkle of crushed red pepper flakes to the filling. A little spice can awaken the taste buds and make your sushi cups sing!
-
Cheesy Touch: For a delightful twist, sprinkle cheese—like mozzarella or cream cheese—on top before baking. Melted cheese adds a rich, creamy layer to your sushi cups that’s simply irresistible!
-
Asian Cucumber Salad Side: Serve these sushi cups alongside a refreshing Asian Cucumber Salad for a well-rounded meal that’s both satisfying and nutritious. The coolness of the salad perfectly complements the warm sushi cups!
Explore these exciting variations to tailor the Easy Baked Salmon Sushi Cups to your taste—your creativity knows no bounds!
Make Ahead Options
These Easy Baked Salmon Sushi Cups are perfect for meal prep enthusiasts looking to save time! You can prepare the sushi rice and salmon mixture up to 24 hours in advance. Simply cook the sushi rice and mix it with the rice vinegar and sugar, then refrigerate. Prepare the salmon filling by combining cubed salmon, soy sauce, Kewpie mayo, sriracha, and sesame oil, and store it in an airtight container. When you’re ready to bake, assemble the sushi cups with prepped nori and rice, then bake them directly from the fridge for 15 minutes. This ensures they are just as delicious as if made fresh, allowing you to enjoy homemade sushi easily on busy weeknights!
Storage Tips for Easy Baked Salmon Sushi Cups
Fridge: Store leftover sushi cups in an airtight container in the refrigerator for up to 2-3 days; this keeps them fresh and delicious for your next snack or meal.
Freezer: For longer storage, freeze the sushi cups in a single layer on a baking sheet; once solid, transfer them to an airtight container or freezer bag for up to 2 months.
Reheating: Reheat the sushi cups in the oven at 350°F (175°C) for about 10 minutes until heated through, or microwave for a quick 1-2 minutes. Enjoy your Easy Baked Salmon Sushi Cups warm!
Wrap for Freshness: If refrigerating, cover each cup lightly with plastic wrap to help retain moisture and prevent them from drying out in the fridge.

Easy Baked Salmon Sushi Cups Recipe FAQs
How do I select the best salmon for my sushi cups?
Absolutely! When choosing salmon, look for bright, firm flesh with a clean, ocean-like smell. Fresh salmon should have a moist appearance and should not be dull or have any dark spots. If you’re opting for frozen salmon, ensure it has been stored at a consistent temperature and defrosted properly before use.
What’s the best way to store leftover sushi cups?
Very! Store any leftover Easy Baked Salmon Sushi Cups in an airtight container in the refrigerator for about 2-3 days. To keep them fresh longer, individually wrap each cup in plastic wrap; this helps retain moisture and flavor.
Can I freeze these sushi cups for later?
Absolutely! To freeze your sushi cups, first place them on a baking sheet in a single layer to solidify. Once frozen, transfer them to a freezer-safe bag or airtight container. They’ll keep well for up to 2 months. Just make sure to label them with the date so you know when they were made!
What if my sushi rice isn’t sticky enough?
No worries! If your sushi rice isn’t sticky, it might not have enough moisture or vinegar. Rinse the rice thoroughly before cooking, and make sure to measure the water accurately while cooking—typically, it’s a 1:1 ratio for sushi rice. If it’s still not sticky, consider adding a little more rice vinegar after cooking to help with adhesion.
Are there any dietary considerations for these sushi cups?
Certainly! The Easy Baked Salmon Sushi Cups are rich in omega-3 fatty acids but can be adjusted for various dietary needs. For gluten-free options, use tamari instead of soy sauce, and check that any sauces you add are gluten-free. If you have allergies, you can substitute the salmon with tofu or cooked shrimp for a different protein option. Always encourage guests to inform you of any allergies before serving!
Easy Baked Salmon Sushi Cups for Effortless Entertaining
Ingredients
Equipment
Method
- Cook the uncooked sushi rice according to package instructions. Mix rice vinegar with white sugar in a microwave-safe bowl until sugar dissolves, then fold into rice and set aside to cool.
- Combine cubed salmon, light soy sauce, Kewpie mayo, sriracha, and sesame oil in a mixing bowl and stir until well incorporated.
- Preheat oven to 400°F (204°C) and prepare nori sheets and muffin tin.
- Cut nori sheets into squares to fit into the muffin tin's cups.
- Spray muffin tin with cooking spray. Place a nori square into each cup, pack sushi rice into each cup, and top with salmon mixture.
- Bake assembled sushi cups for 15 minutes until salmon is opaque and nori tops are golden.
- Cool slightly before transferring to a serving platter; garnish with sriracha, Kewpie mayo, furikake, and green onions.
Leave a Reply