
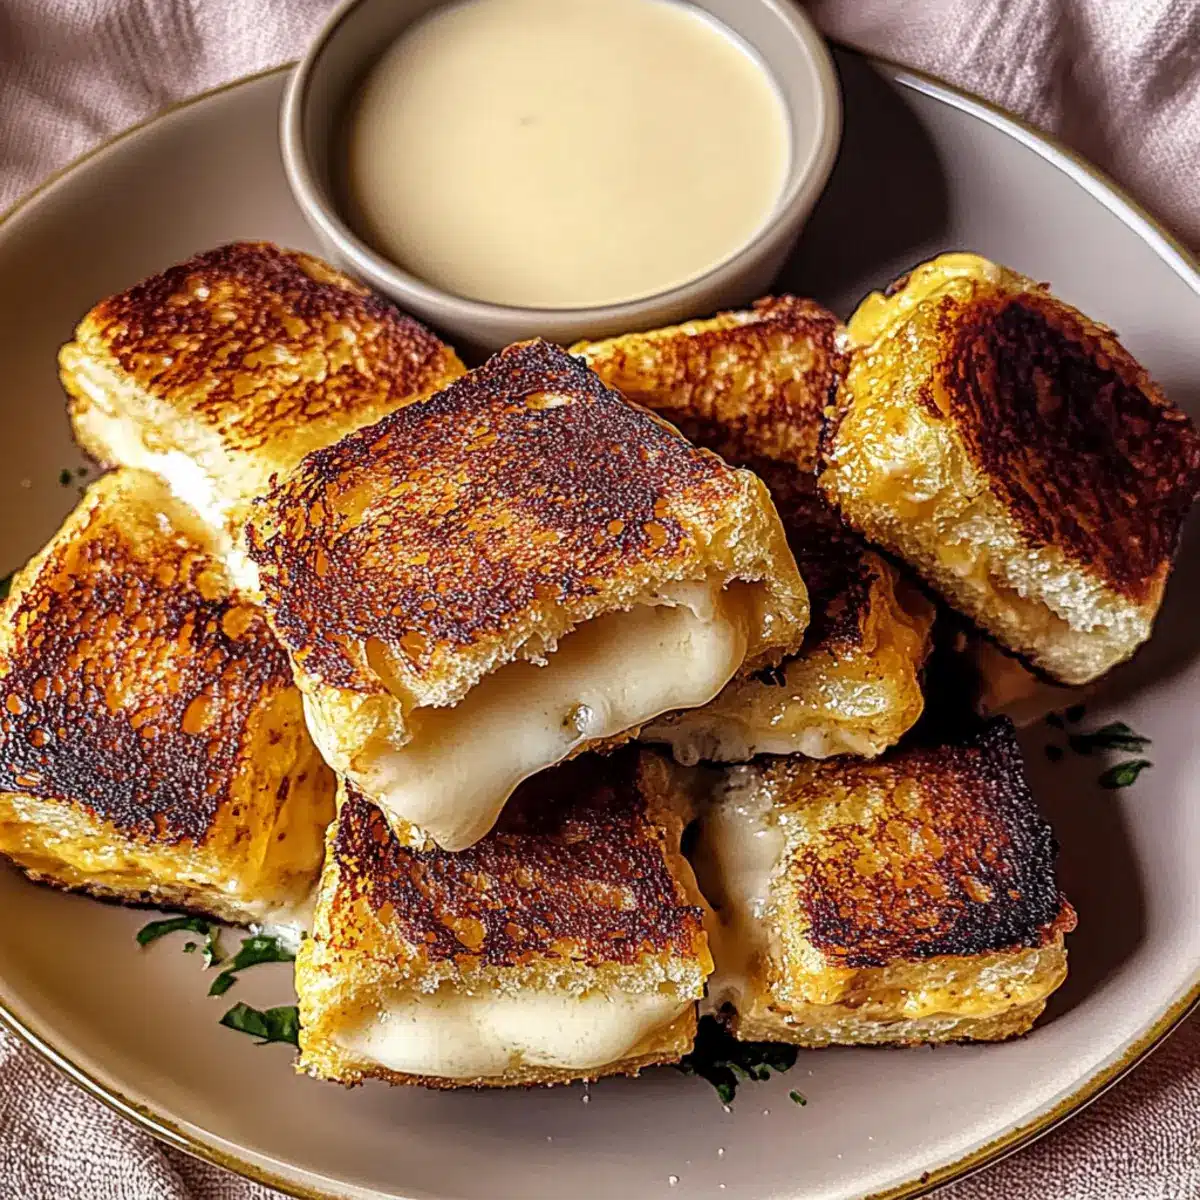
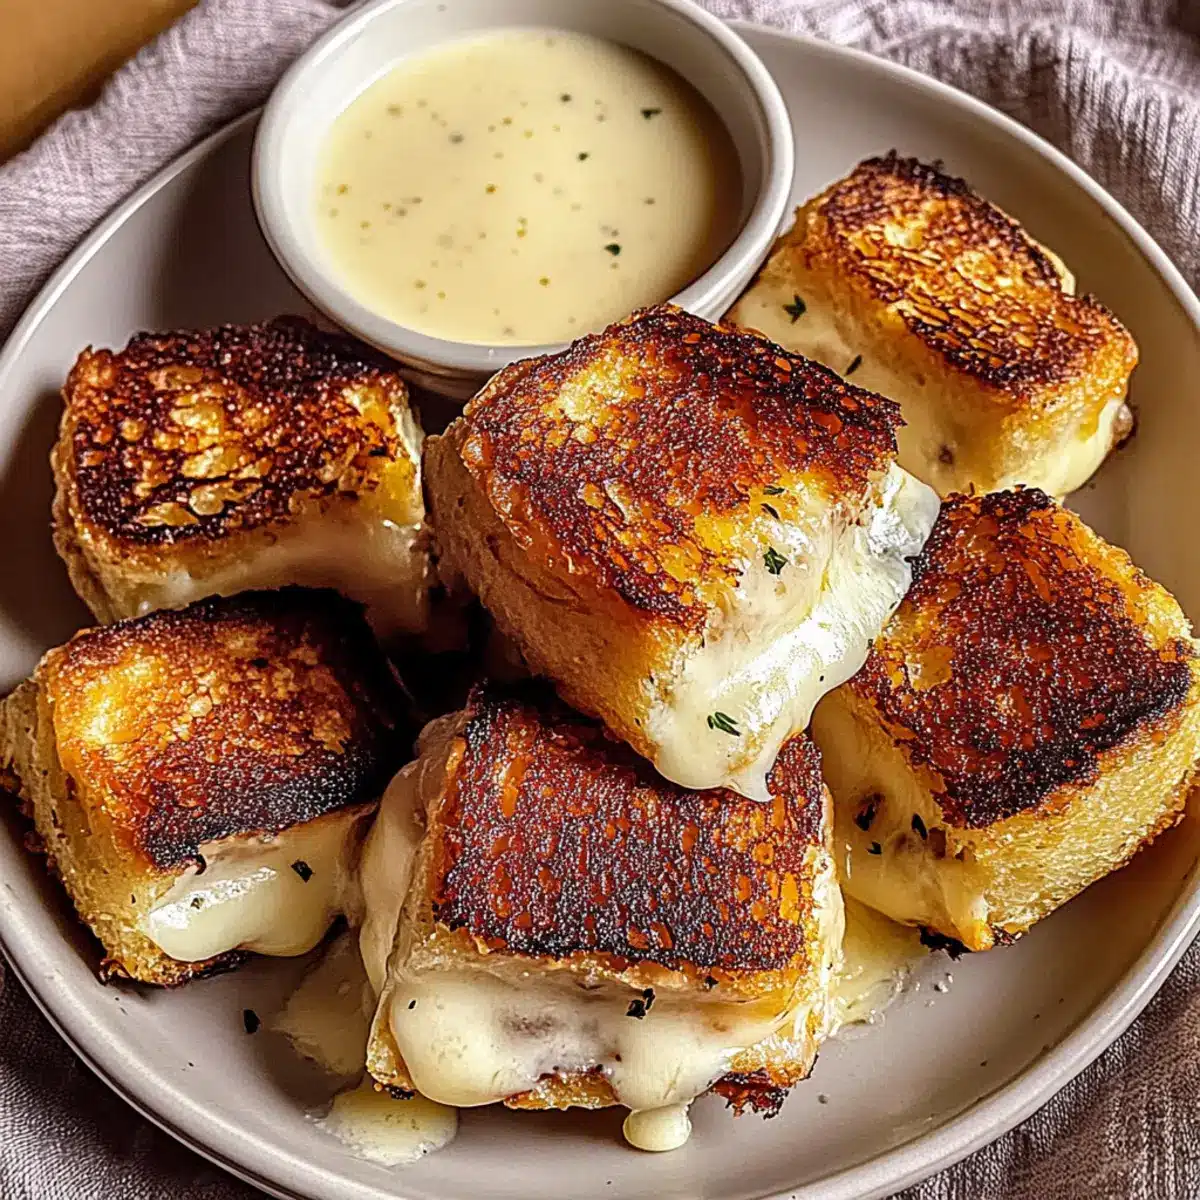
I stumbled upon a delightful secret at a beachside café: the Hawaiian Roll Grilled Cheese. The moment I took a bite, I was transported to a cozy paradise, where sweet, fluffy rolls cradle the most indulgent, gooey cheese imaginable. This recipe transforms a classic comfort food into an unforgettable experience, perfect for those quick snacks or cozy movie nights when you want something effortlessly delicious. Besides being incredibly easy to whip up, this dish allows for endless customization—switch up the cheese or pair it with your favorite toppings. Are you ready to treat yourself to this sweet and savory creation? Let’s dive in!
Why is Hawaiian Roll Grilled Cheese a Must-Try?
Comforting, Homestyle Flavor: This recipe transforms a classic into a cozy dining experience, perfect for any occasion.
Endless Customization: Feel free to mix it up with different cheeses like pepper jack or gouda, and even add toppings like caramelized onions.
Quick and Simple: With straightforward steps, you’ll have a mouthwatering sandwich ready in no time—ideal for a rushed lunch or late-night snack!
Crowd-Pleaser: Great for sharing at gatherings, pair it with a refreshing salad or a bowl of tomato soup for a complete meal. It’s hard to resist! If you love this fusion of sweetness and gooeyness, you might also enjoy our Hawaiian Chicken Salad for a delightful twist on Hawaiian flavors. Let’s get cooking!
Hawaiian Roll Grilled Cheese Ingredients
For the Sandwich
• Hawaiian Rolls – These sweet, soft rolls are essential for creating that delightful contrast with the gooey cheese.
• Cheese (your choice) – The heart of this dish; try pepper jack for a little heat or a classic like cheddar for richness.
• Butter – This key ingredient ensures a crispy, golden-brown crust; don’t skimp on the buttery goodness!
Optional Toppings
• Caramelized Onions – Add a sweet, savory depth that pairs beautifully with the cheese.
• Crispy Bacon – For those who crave a savory crunch, this brings an irresistible flavor boost.
• Fresh Herbs – Sprinkle some basil or chives for a refreshing touch that brightens up each bite.
Feel free to get creative with the toppings or cheese selection to make this Hawaiian Roll Grilled Cheese your own!
Step‑by‑Step Instructions for Hawaiian Roll Grilled Cheese
Step 1: Prepare Your Ingredients
Start by gathering your Hawaiian rolls and cheese of choice. Ensure your workspace is clean, and then slice each roll in half, being careful not to cut all the way through. This will create a perfect pocket for all that gooey goodness. Have your butter ready to go as you prep to assemble your delicious Hawaiian Roll Grilled Cheese.
Step 2: Heat Up Your Pan
Place a non-stick skillet over medium heat to preheat. While the skillet warms up, generously butter the insides of each sliced Hawaiian roll. The butter is crucial as it will help achieve a beautiful, golden-brown crust. Keep an eye on the skillet’s temperature; you want it warm but not smoking, ready for that first sizzling bite!
Step 3: Assemble Your Sandwiches
With the skillet hot and ready, place the bottom halves of your Hawaiian rolls onto the skillet. Pile a generous amount of your chosen cheese onto each roll’s bottom half—this is the heart of your Hawaiian Roll Grilled Cheese. Next, gently press down the top halves to create a cozy sandwich embrace for the cheesy filling.
Step 4: Grill Until Golden Brown
Allow your assembled sandwiches to cook for about 3-4 minutes, monitoring closely. You’ll know they’re ready to flip when the bottoms turn a delightful golden brown. Carefully flip each sandwich using a spatula and continue to grill for another 3-4 minutes, ensuring they develop a crispy texture while the cheese melts. If needed, cover with a lid for a moment to aid in melting.
Step 5: Slice and Serve
Once both sides are golden brown and the cheese is deliciously gooey, remove the sandwiches from the skillet and let them cool for about a minute. This will make it easier to slice. Cut each sandwich in half to reveal the melty interior, showcasing the deliciousness within. Serve your Hawaiian Roll Grilled Cheese hot, perhaps with a favorite dipping sauce or on its own!

Expert Tips for Hawaiian Roll Grilled Cheese
- Watch the Heat: Cooking on medium-low heat prevents burnt bread while allowing the cheese to melt perfectly. Patience is key for that golden crust.
- Be Generous with Cheese: Don’t skimp on the cheese! A thick layer helps achieve the optimal gooeyness you crave in Hawaiian Roll Grilled Cheese.
- Choose Your Cheese Wisely: Experiment with various cheeses like gouda or pepper jack. Each will bring a unique flavor to your sandwich.
- Add Some Crunch: For extra texture, consider adding crispy bacon or fresh herbs to elevate your Hawaiian Roll Grilled Cheese experience.
- Store Smart: If you have leftovers, place them in an airtight container in the fridge. Reheat in a skillet to maintain that crispy crust.
Make Ahead Options
These Hawaiian Roll Grilled Cheese sandwiches are perfect for busy weeknights or meal prep enthusiasts! You can prepare the Hawaiian rolls and slice the cheese up to 24 hours in advance, storing them separately in an airtight container in the refrigerator to maintain freshness. When you’re ready to enjoy, simply butter the insides of the rolls and assemble the sandwiches right before grilling. This way, you’ll have hot, melty goodness in no time. Just remember, grilling on medium-low heat is key to achieving that golden, crispy crust while ensuring the cheese is perfectly melted. Enjoy restaurant-quality results with minimal effort!
Storage Tips for Hawaiian Roll Grilled Cheese
- Fridge: Store any leftover Hawaiian Roll Grilled Cheese in an airtight container for up to 2 days. This protects the sandwich and keeps the flavors fresh while preventing dryness.
- Freezer: For longer storage, freeze wrapped sandwiches tightly in plastic wrap or foil for up to 1 month. To reheat, let them thaw overnight in the fridge before warming in a skillet.
- Reheating: When ready to enjoy again, reheat the sandwich in a skillet over medium-low heat for about 5 minutes per side, or until heated through and crispy on the outside.
- Room Temperature: Keep leftover sandwiches at room temperature for no more than 2 hours to ensure food safety and maintain quality.
What to Serve with Hawaiian Roll Grilled Cheese
Elevate your mealtime experience with delightful pairings that complement the sweet and savory notes of this irresistible sandwich.
- Tomato Soup: A classic accompaniment, the tangy flavor of tomato soup contrasts beautifully with the rich cheese, creating a comforting duo.
- Crisp Green Salad: A light, refreshing salad with a zesty vinaigrette adds crunch and balances the richness of the grilled cheese.
- Sweet Potato Fries: The slight sweetness and crispy texture of the fries harmonize with the sandwich, making each bite a cozy experience.
- Caramelized Onions: Adding these savory-sweet slivers to the mix enhances the flavor profile and gives your meal a gourmet twist.
- Buffalo Cauliflower Bites: These spicy bites bring a delightful kick, offering a tasty contrast to the creamy goodness of the Hawaiian Roll Grilled Cheese.
- Briny Olives: A small bowl of briny olives provides a unique flavor that cuts through the richness, perfect for a sophisticated touch.
Imagine each bite bringing together the gooey warmth of the sandwich with these delicious sides, crafting a meal that will linger in your memory long after the last bite is savored.
Hawaiian Roll Grilled Cheese Variations
Feel free to let your creativity shine as you customize this delightful grilled cheese with flavors that excite your palate.
- Dairy-Free: Swap regular cheese for vegan cheese alternatives to create a plant-based delight without sacrificing taste.
- Bread Twist: Try using brioche or sourdough for a unique texture and flavor, elevating the classic combination even further. Lightly toasted, they enhance the crunchy experience.
- Spicy Kick: Add pepper jack cheese or slice some jalapeños for an addictive heat that makes each bite adventurous and exciting.
- Savory Additions: Toss in caramelized onions or crispy bacon for an irresistible crunch that takes this comfort food to another level. Imagine the sweet savoriness with melted cheese!
- Herb-Infused: Sprinkle fresh herbs like basil or chives for a sprinkle of freshness that invigorates each bite, creating a lovely balance with the richness of the cheese.
- Veggie Boost: Incorporate roasted red peppers or sautéed spinach for a tasty and nutritious twist, making it a delightful option for a light meal.
- Sweet Fusion: Spread a hint of fruit preserves, like pineapple or fig, on the insides of the roll before adding cheese for a sweet-savory explosion in every mouthful.
- Pairing Ideas: Serve with a side of tomato soup or a light salad for a well-rounded meal. If you love that combination, consider also trying our Vegetable Tortilla Roll for something different!

Hawaiian Roll Grilled Cheese Recipe FAQs
What type of Hawaiian rolls should I use?
Absolutely! For the best results, use classic Hawaiian rolls that bring sweetness and softness. However, don’t hesitate to substitute with brioche or sourdough if you’re in the mood for something different. Each type of bread will impart its own unique flavor and texture to your grilled cheese.
How should I store leftovers of my Hawaiian Roll Grilled Cheese?
I often recommend storing leftovers in an airtight container in the fridge for up to 2 days. This will keep the sandwich fresh while retaining its delicious flavors. When you’re ready to enjoy them again, simply reheat in a skillet over medium-low heat for the best texture—about 5 minutes per side until hot and crispy!
Can I freeze my Hawaiian Roll Grilled Cheese?
Absolutely! If you want to save some for later, wrap your sandwiches tightly in plastic wrap or foil and freeze them for up to 1 month. To reheat, let them thaw overnight in the fridge. Once thawed, warm them in a skillet on medium-low heat for about 5 minutes per side until heated through and the outside is crispy.
What if my cheese isn’t melting properly?
Very frustrating, I know! If your cheese isn’t melting, you may need to adjust your cooking temperature. Ensure you’re cooking on medium-low heat, as higher temperatures can burn the bread before the cheese has a chance to melt. Additionally, covering the skillet briefly with a lid can help create steam that encourages melting. Just give it a little more time if necessary!
Are there any dietary considerations for this recipe?
For those with dietary restrictions, feel free to customize your Hawaiian Roll Grilled Cheese with gluten-free bread or plant-based cheese alternatives. Just be sure to check labels for allergens if you’re serving this to guests. If you’re making this for pets, avoid ingredients like onions or garlic, which can be harmful to them.
How long can I keep leftovers at room temperature?
Leftover Hawaiian Roll Grilled Cheese shouldn’t be left out at room temperature for more than 2 hours. After that, bacteria can start to grow and compromise the safety and quality of your food. Always store them in the fridge if you’re not going to consume them right away!
Hawaiian Roll Grilled Cheese: Melty Joy in Every Bite
Ingredients
Equipment
Method
- Prepare Your Ingredients: Gather your Hawaiian rolls and cheese of choice. Slice each roll in half, being careful not to cut all the way through.
- Heat Up Your Pan: Place a non-stick skillet over medium heat and butter the insides of each sliced Hawaiian roll.
- Assemble Your Sandwiches: Place the bottom halves of your Hawaiian rolls onto the skillet and pile cheese onto each bottom half. Press down with the top halves.
- Grill Until Golden Brown: Cook for about 3-4 minutes until golden brown, then flip and grill for another 3-4 minutes.
- Slice and Serve: Remove the sandwiches, cool slightly, slice in half to reveal the melty interior, and serve hot.
Leave a Reply