
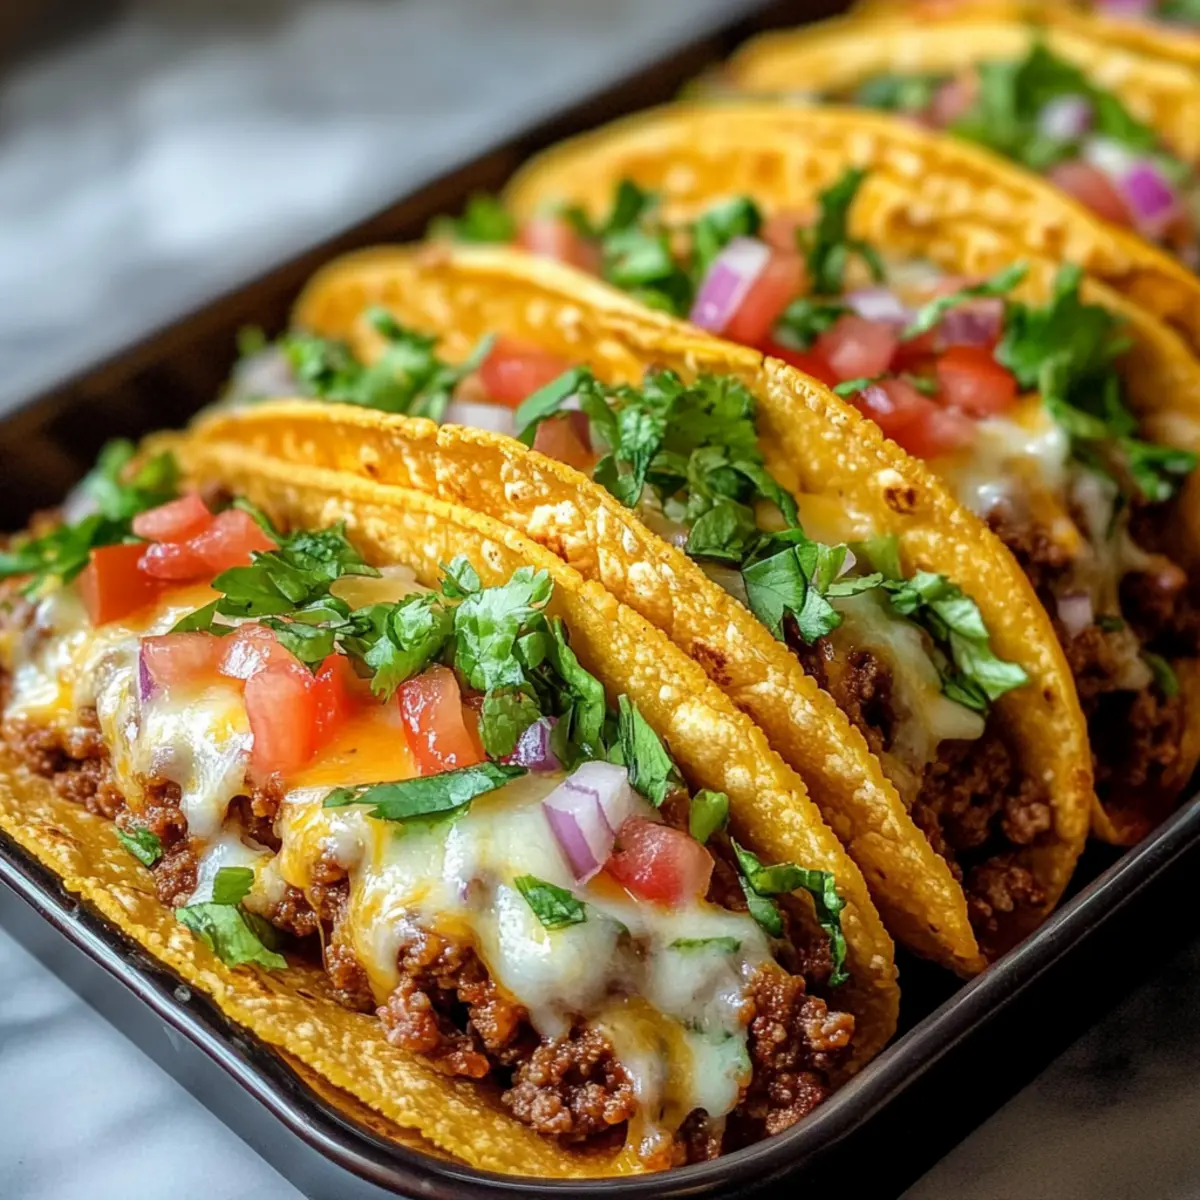
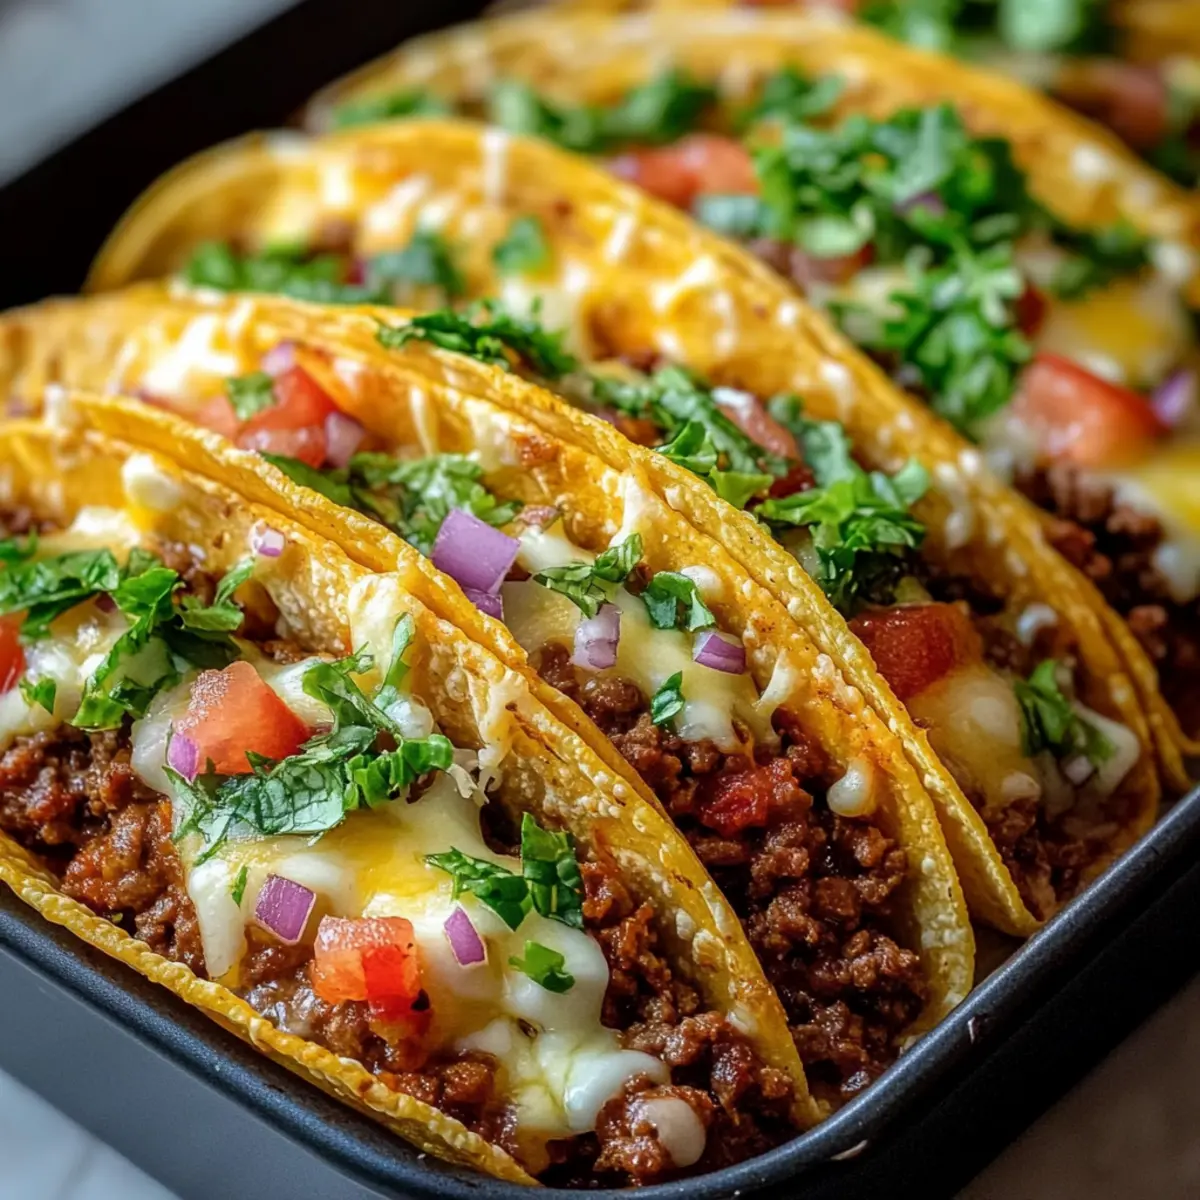
As I stood by the kitchen counter, the intoxicating scent of sizzling ground beef mingling with melted cheese filled the air, catapulting me back to my childhood taco nights. Meet my Oven-Baked Cheesy Tacos, where crispy taco shells meet a savory, loaded filling that’s a true crowd-pleaser. This recipe is perfect for those busy weeknights when you crave an easy, comforting meal that everyone will love. In just 30 minutes, you can whip up these quick tacos, customizing them with your favorite fresh toppings for a delightful twist that elevates traditional tacos. Plus, they’re gluten-free, so everyone can join in on the deliciousness! Ready to learn how to make a dish that’ll have your family begging for seconds? Let’s dive in!

Why are Oven-Baked Cheesy Tacos a Must-Try?
Quick, this recipe is perfect for those hectic weeknights when you need a filling dinner in just 30 minutes. Crispy taco shells hold a savory filling bursting with flavor, creating a delightful crunch in every bite. Customizable toppings make these tacos versatile; whether you want classic lettuce and tomatoes or a spicy kick with jalapeños, the choice is yours! Gluten-free options ensure everyone at the table can enjoy this comfort food classic. Don’t miss out on serving these alongside a refreshing salad or guacamole to complete your meal; it’s a true family favorite that guarantees second helpings!
Oven-Baked Cheesy Tacos Ingredients
Prepare to create the ultimate comfort food with these Oven-Baked Cheesy Tacos!
For the Filling
- Ground Beef – Provides a hearty filling; substitute with ground turkey or chicken for a lighter dish.
- Onion – Adds sweetness when sautéed; shallots can provide a milder taste alternative.
- Minced Garlic – Enhances the overall flavor; fresh garlic is more aromatic than powdered.
- Taco Seasoning – Delivers classic taco flavor; consider homemade spices like cumin, chili powder, and paprika if desired.
- Tomato Sauce or Salsa – Contributes moisture and tang; fresh diced tomatoes are a delightful alternative.
For the Tacos
- Hard Taco Shells – Acts as the vessel for the filling; ensure they’re sturdy enough to hold all ingredients.
- Shredded Cheese – Creates a gooey texture; cheddar or Monterey Jack is recommended, or use plant-based cheese for a vegan twist.
For Fresh Toppings
- Lettuce, Tomatoes, Red Onion, Cilantro – These add freshness and crunch; feel free to swap with olives or jalapeños to suit your taste!
Step‑by‑Step Instructions for Oven-Baked Cheesy Tacos
Step 1: Preheat the Oven
Begin by preheating your oven to 400°F (200°C). This essential step ensures that your Oven-Baked Cheesy Tacos cook evenly and the shells become delightfully crispy. While the oven warms up, gather your ingredients and prepare your baking dish. A glass or metal baking dish works perfectly for arranging your taco shells upright.
Step 2: Arrange the Taco Shells
Once your oven is preheated, take your hard taco shells and arrange them in the baking dish in an upright position. Make sure they are snugly fit together to prevent tipping over during baking. This setup ensures that each taco holds its filling beautifully as it bakes, resulting in perfectly loaded cheesy tacos.
Step 3: Cook the Ground Beef
In a large skillet over medium heat, add ground beef and diced onion, breaking it apart with a spatula. Cook for about 5-7 minutes until the meat is browned and no longer pink, and the onions are softened, releasing their sweetness. Drain any excess fat from the skillet to keep the filling lean and flavorful.
Step 4: Add Garlic and Seasoning
Stir in minced garlic and taco seasoning into the skillet with the cooked beef and onions. Cook for 1 minute until fragrant, allowing the spices to bloom. This flavorful mixture will be the heart of your Oven-Baked Cheesy Tacos, giving them the classic taste everyone loves.
Step 5: Incorporate Tomato Sauce or Salsa
Pour in your choice of tomato sauce or salsa into the beef mixture. Reduce the heat and let it simmer for about 5 minutes, stirring occasionally, until everything is warmed through and well combined. The sauce adds moisture and tang to the filling that will make your tacos irresistible.
Step 6: Fill the Taco Shells
Carefully spoon the savory beef mixture into each arranged taco shell, filling them generously, but be cautious not to overfill. A well-filled taco ensures every bite is flavorful without spilling all the contents during the baking process, creating those perfect Oven-Baked Cheesy Tacos.
Step 7: Add Shredded Cheese
Top each filled taco with a generous handful of shredded cheese of your choice, such as cheddar or Monterey Jack. The cheese will melt deliciously during baking, creating that gooey texture everyone craves. Make sure to cover the filling evenly, as this will contribute to the glorious cheesiness of your tacos.
Step 8: Bake Until Crispy
Place the baking dish in the preheated oven and bake for 10-15 minutes. Keep an eye on the tacos as they cook, and look for the cheese to become melted and bubbly, while the taco shells turn a golden brown. This visual cue means your Oven-Baked Cheesy Tacos are ready to come out!
Step 9: Add Fresh Toppings
Once baked, carefully remove your cheesy tacos from the oven and let them cool for a minute. Top each taco with fresh ingredients like shredded lettuce, diced tomatoes, and chopped cilantro to enhance flavor and add a crunchy freshness. Enjoy these delightful Oven-Baked Cheesy Tacos hot, and consider serving with sour cream on the side.
Oven-Baked Cheesy Tacos Variations & Substitutions
Feel free to play with these Oven-Baked Cheesy Tacos to create a dish that perfectly suits your taste buds!
-
Vegetarian Option: Swap ground beef with black beans or lentils for a hearty plant-based twist. You’ll still enjoy that savory richness, but in a lighter, veggie-packed format.
-
Gluten-Free: Use gluten-free taco shells to make this dish safe for gluten-sensitive family members. This simple swap means everyone can indulge in the cheesy goodness!
-
Spicy Kick: Add diced jalapeños to the meat filling or use a spicy salsa for those who crave heat. A little extra spice adds excitement to every crunchy bite!
-
Flavorful Cheese: Experiment with different cheese varieties such as pepper jack or Gouda for unique flavor profiles. You might discover your new favorite cheesy combination!
-
Crunchy Veggies: Layer in thinly sliced bell peppers or zucchini along with your meat filling for added crunch and nutrition. You’ll be amazed at how well these veggies blend with the rich flavors.
-
Taco Seasoning Twist: Try homemade taco seasoning by mixing cumin, smoked paprika, and oregano to customize the flavor. This is a great way to experiment with spices and create a signature taste.
-
Toppings Galore: Fresh toppings don’t stop at lettuce and tomatoes; consider adding sliced olives, avocado, or even a zesty corn salsa for exciting texture contrasts. Mix and match to keep things lively!
-
Cheesy Baked Ziti: For a pasta twist, consider filling your taco shells with ingredients similar to Cheesy Baked Ziti and baking them for a lavish, cheesy delight.
Customize these delicious tacos to make them uniquely yours! Whether you’re opting for something lighter or craving that cheesy richness, every variation promises comfort and joy right at your dinner table.
Expert Tips for Oven-Baked Cheesy Tacos
• Preheat Properly: Ensure your oven is fully preheated to 400°F (200°C) before baking for perfectly crispy taco shells.
• Avoid Overfilling: Filling tacos to the brim might seem tempting, but it can lead to messy spillage during baking. Keep it balanced!
• Select Quality Shells: Choose sturdy hard taco shells that won’t crack under pressure. This is crucial for holding all your delicious filling.
• Cool Slightly: Allow your baked tacos to cool for a minute before serving; they’ll be very hot and waiting helps set the cheese.
• Stir The Filling: Stir the beef mixture well to incorporate spices evenly, ensuring each Oven-Baked Cheesy Taco is full of flavor.
• Store Smart: If you have leftovers, store them in an airtight container in the fridge for up to three days, keeping the taste fresh and yummy!
What to Serve with Quick & Cheesy Oven-Baked Tacos?
A delightful meal deserves equally scrumptious accompaniments to enhance the experience and bring flavor together.
- Guacamole: Creamy and fresh, this buttery dip brings a rich contrast to the crispy tacos.
- Refried Beans: Savory and hearty, refried beans create a comforting side that pairs beautifully with every cheesy bite.
- Spanish Rice: Fluffy and seasoned, this vibrant dish complements the Mexican flavors of your tacos while adding a warm, filling element.
- Fresh Salad: A zesty green salad, tossed with lime vinaigrette, brings a refreshing zest that balances the richness of the tacos.
- Sour Cream: A dollop of cool sour cream adds a creamy texture, enhancing the overall flavor experience of each taco!
- Pico de Gallo: This fresh salsa adds crunch and brightness that lifts the savory elements of the tacos, encouraging a vibrant flavor explosion.
- Nachos: Layered nachos with cheese and jalapeños create a fun, shareable snack that echoes the taco theme, turning any meal into a festive gathering.
Whether it’s vibrant vegetables or dips that delight, these pairings create a delightful feast that brings the flavors of your Oven-Baked Cheesy Tacos to life!
How to Store and Freeze Oven-Baked Cheesy Tacos
- Fridge: Store leftover Oven-Baked Cheesy Tacos in an airtight container for up to 3 days to maintain flavor and freshness. Ensure they are completely cool before sealing.
- Freezer: For longer storage, freeze unbaked taco filling separately in a freezer-safe bag for up to 3 months. Thaw in the fridge overnight before assembling.
- Reheating: Reheat leftover tacos in the oven at 350°F (175°C) for about 10-15 minutes to keep the shells crispy. Avoid microwaving, as it can make them soggy.
- Make-Ahead: Prepare the beef filling and fill taco shells, then store them in the fridge for up to 24 hours before baking for an easy weeknight dinner.
Make Ahead Options
These Oven-Baked Cheesy Tacos are fantastic for meal prep, allowing you to savor homemade convenience during busy weeknights! You can prepare the flavorful beef mixture and stuff the hard taco shells up to 24 hours in advance; just store them in an airtight container in the refrigerator to maintain freshness. When you’re ready to serve, simply bake the filled tacos at 400°F (200°C) for 10-15 minutes until the cheese is melted and the shells are crispy. This way, you enjoy all the deliciousness with minimal effort, making your dinner time a breeze!
Oven-Baked Cheesy Tacos Recipe FAQs
What type of ground meat should I use for the filling?
Absolutely! Ground beef is traditional for a hearty filling. However, if you’re looking for lighter options, ground turkey or chicken works wonderfully as well. For a vegetarian twist, consider substituting with black beans or lentils; they add protein and are very filling!
How should I store leftover Oven-Baked Cheesy Tacos?
Store any leftover Oven-Baked Cheesy Tacos in an airtight container in the fridge. They will stay fresh for up to 3 days. Make sure the tacos are completely cool before sealing to maintain their flavor and texture. You can enjoy them cold or reheat them!
Can I freeze the taco filling?
Yes, you can! For freezing, place any unbaked taco filling in a freezer-safe bag and seal it tightly; it can last for up to 3 months. When you’re ready to use it, simply thaw it in the fridge overnight. This makes for a fantastic meal prep solution!
What’s the best way to reheat leftover tacos?
To reheat your leftover Oven-Baked Cheesy Tacos, preheat your oven to 350°F (175°C). Place the tacos on a baking sheet and warm them for about 10-15 minutes. This method keeps the taco shells crispy, which is essential for maintaining the perfect texture.
Are these tacos suitable for gluten-free diets?
Very! To make sure your Oven-Baked Cheesy Tacos are gluten-free, simply use gluten-free taco shells and check the labels on your taco seasoning and any sauces to avoid gluten-containing ingredients. This way, everyone can enjoy the meal without worry!
How do I know if my taco shells are fresh enough?
It’s really important to choose the right shells! Check for sturdy hard taco shells that aren’t cracked or damaged. If they have dark spots all over or feel too brittle, it’s best to choose a fresher pack. Look for shells that are within their expiration date for the best results!

Crispy Oven-Baked Cheesy Tacos: Comfort Food Done Right
Ingredients
Equipment
Method
- Preheat your oven to 400°F (200°C).
- Arrange the hard taco shells in a baking dish in an upright position.
- In a skillet over medium heat, cook ground beef and diced onion for about 5-7 minutes until browned.
- Stir in minced garlic and taco seasoning; cook for 1 minute until fragrant.
- Add tomato sauce or salsa to the mixture and let it simmer for about 5 minutes.
- Spoon the beef mixture into each taco shell.
- Top each taco with shredded cheese.
- Bake for 10-15 minutes until the cheese is melted and bubbly.
- Top with fresh ingredients like lettuce, tomatoes, and cilantro before serving.
Leave a Reply